

Installing a ramrod holder in a Duramaxx stock
Oct 27, 2010 6:33:44 GMT -5
Post by Jed on Oct 27, 2010 6:33:44 GMT -5
I thought it might be helpful to some guys who have the Duramaxx stock to see how a ramrod holder can be installed in the stock. I also am indebted to Richard for a couple of ideas he gave me, and others whose work has appeared at various places on this board. Thanks!
Tools needed:
Dremel with round grinder attachment and round belt sander attachment.
Cordless drill and drill bit set
Level
Plumber's pipe cutter
80 grit, 120 grit, 220 grit sandpaper
Tape measure, pencil
Materials needed:
1/2" Inside Diameter aluminum rod
10-24 x 9/32" Brad Hole (Lowe's part # 216877)
10-24 x 3/4"Socket Cap Screw (Lowe's part # 213903)
2-part epoxy
1/4" x 6" bolt
fingernail polish remover and cotton patches
Here is a picture of the brad hole and socket cap screw:

The first step was to insert my ramrod through the thimble and down to the stock. I then marked with a marker the outline of the ramrod on the stock. I now had a rough estimate of how much stock to take off.
Next I cut my length of aluminum using the pipe cutter. I planned put the cut end toward the rear of the stock, and polished the whole rod with sandpaper. This took off any grease that might have been on from the factory, as well as provided a rough surface for the epoxy to bond to.
I used the dremel tool to remove the material from the end of the stock where I had marked. Then using some marking paint and the level, I dipped the end of another section of aluminum rod in the paint and held it level and slid it to the next portion that needed to be removed. The paint gave me a rough marking of how much material needed to be removed. You can see the final results in this picture:
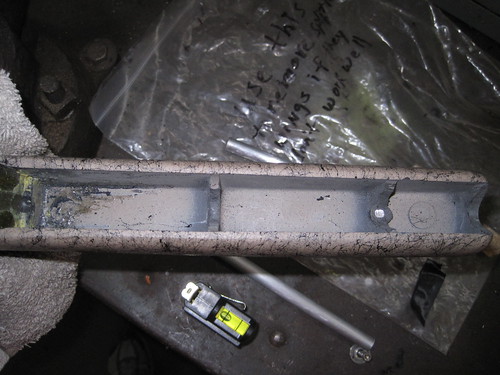
After grinding all these notches out, I put the rod I wanted to use for the ramrod in the stock and checked it with the level. I then put the action and barrel back in the stock to check for clearance. I needed a little more, so I went slowly and ground out all three sections a little more. I also used the sandpaper to clean up the sides of the stock - it was not parallel with my barrel, so I got a 2" piece of PVC pipe and use 80 grit sandpaper to sand it down parallel.
Tools needed:
Dremel with round grinder attachment and round belt sander attachment.
Cordless drill and drill bit set
Level
Plumber's pipe cutter
80 grit, 120 grit, 220 grit sandpaper
Tape measure, pencil
Materials needed:
1/2" Inside Diameter aluminum rod
10-24 x 9/32" Brad Hole (Lowe's part # 216877)
10-24 x 3/4"Socket Cap Screw (Lowe's part # 213903)
2-part epoxy
1/4" x 6" bolt
fingernail polish remover and cotton patches
Here is a picture of the brad hole and socket cap screw:
The first step was to insert my ramrod through the thimble and down to the stock. I then marked with a marker the outline of the ramrod on the stock. I now had a rough estimate of how much stock to take off.
Next I cut my length of aluminum using the pipe cutter. I planned put the cut end toward the rear of the stock, and polished the whole rod with sandpaper. This took off any grease that might have been on from the factory, as well as provided a rough surface for the epoxy to bond to.
I used the dremel tool to remove the material from the end of the stock where I had marked. Then using some marking paint and the level, I dipped the end of another section of aluminum rod in the paint and held it level and slid it to the next portion that needed to be removed. The paint gave me a rough marking of how much material needed to be removed. You can see the final results in this picture:
After grinding all these notches out, I put the rod I wanted to use for the ramrod in the stock and checked it with the level. I then put the action and barrel back in the stock to check for clearance. I needed a little more, so I went slowly and ground out all three sections a little more. I also used the sandpaper to clean up the sides of the stock - it was not parallel with my barrel, so I got a 2" piece of PVC pipe and use 80 grit sandpaper to sand it down parallel.

