|
|
Post by DBinNY on Jan 4, 2010 23:31:18 GMT -5
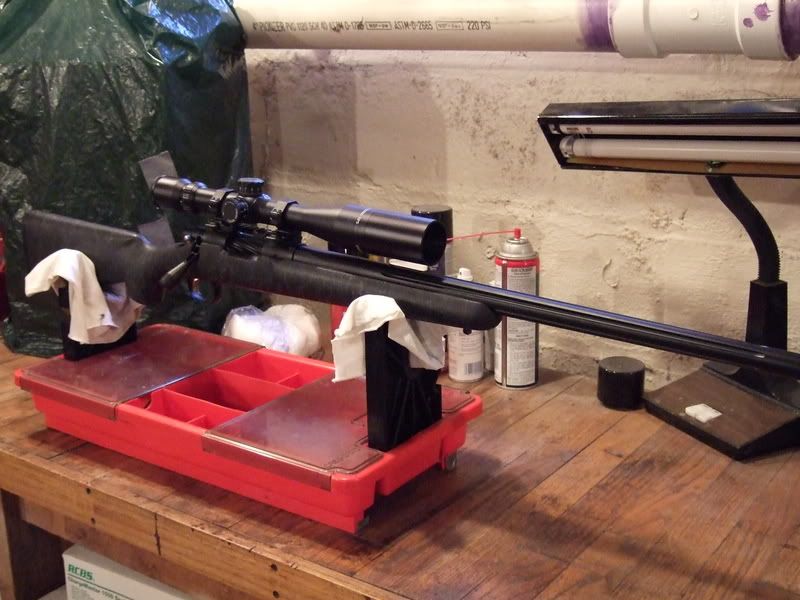
I finally gave in and decided to add a third pillar and bed the action on my SS laminate. Since I installed the Pac Nor .45 I had been noticing that my front pillar appeared to be rotating because the shiny bearing surfaces on top of the pillar were not aligned with the bore and I was getting some forearm contact after a couple of shots. The deer did not seem to notice this imperfection. I came to discover that the front pillar was loose and was free to move downward with any pressure on the barrel. The rear pillar was also loose but that's trapped between the action and the trigger guard so it's probably not as serious. This is something anybody ought to look for (at least with the laminate stocks, I'm not familiar with the tupperware stocks). I may have simply solved the problem by gluing the pillar back in its intended position but I've been wanting to do this project for a while anyways. After extensive research on the board and some invaluable coaching from Richard via PMs throughout the process (Thanks Richard!) I felt I was ready. I wanted to do this myself rather than send it to one of the experts just because... Here's a picture of the third pillar which I made from solid 1/2" aluminum stock and drilled out on a unimat lathe which centered it nicely. The hole for the 1/4" screw was drilled 5/16" for proper clearance. I drilled and tapped the hole in the receiver 1/4-28 on a drill press. Note the socket head screws. I used these in the third pillar and for bedding because they have much deeper (and one size larger) allen heads and I felt more confident that I could get them back out. I recessed the head of the third pillar screw with a 3/8" bit. 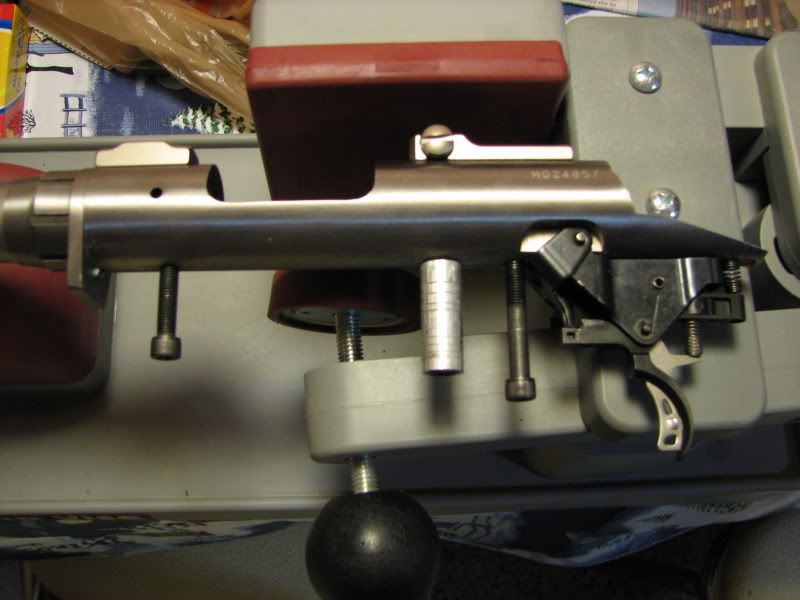 Here's what the third pillar screw looks like after bedding. I did mess the hole through the stock up slightly but it's nothing you couldn't fix with a little JB weld. Most of the error was inside and out of sight! I chose to bed the whole thing in one step. You just have to think it through so you put release agent (kiwi) on all the right places which, in this case, is everything on the action except the outside of the third pillar. I wrapped tape around each of the action screws to center them in their respective pillars and made sure my third pillar was floating stress free in its hole.  I then taped and clayed up places I didn't want the goop to go and here's the result. I feel I learned plenty on how I could have done a better job with tape and clay but still ended up with a satisfactory result (I think). I did have one slight void in the bedding on one extreme top corner of the recoil lug but I'm gonna let well enough alone for now. I now have an action that fits the bedding like a glove and a centered and floated barrel and tang and I never have to worry about anything flopping around when I take my bolt out anymore. I did manage to add one more ding to my stock during the wood removal process to go along with all the other dings I've put in it hunting. If anybody has an easy fix for these dings, I'm all ears. This was a fun and rewarding project but it does require a little courage to apply a drill bit to your favorite gun (at least the first time). 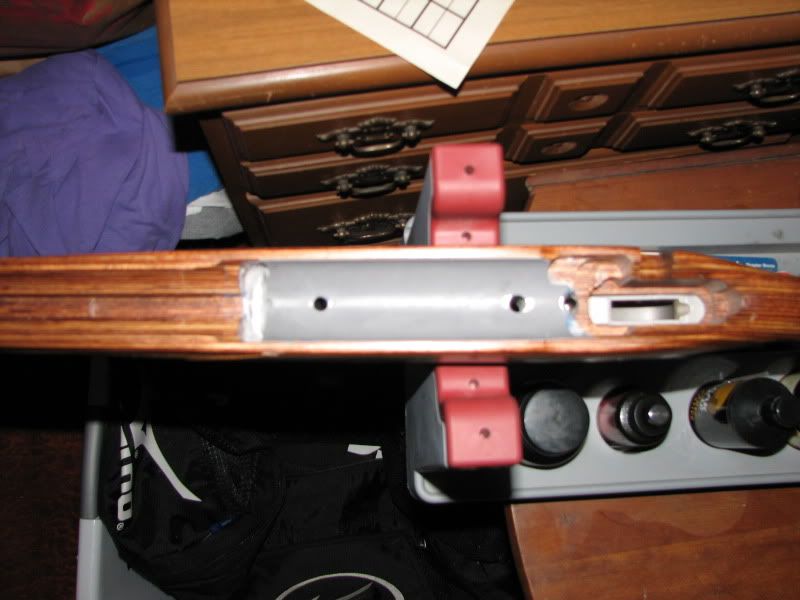 |
|
|
|
Post by ET on Jan 5, 2010 3:19:48 GMT -5
DBinNY
The bedding job looks real good for a 1st time go. Nicely done.
Know what you mean about carefully planning your approach and feeling any apprehension until the receiver breaks free from the bedding compound.
Then there’s the feeling of gratification/accomplishment of “Hey I did it right”.
Having a good coach like Richard with his experience to guide you also makes a difference.
Will enjoy hearing about your next range visit results.
Ed
|
|
|
|
Post by Richard on Jan 5, 2010 16:44:30 GMT -5
This is my first peek at the finished product also!
Well there you go DB! Very nice job...........I'm proud of you!!
Richard
|
|
|
|
Post by clayman on Jan 5, 2010 18:44:20 GMT -5
dbinny to remove dings from stock. wet a wash towel and place it on ding. using a hot iron place it over ding to get desired results. clayman
|
|
|
|
Post by chuck41 on Jan 5, 2010 19:10:50 GMT -5
That is a pretty weapon, and a pretty bedding job. You should be proud, and when you make the next trip to the range I bet you will be!
|
|
|
|
Post by songdog on Jan 5, 2010 19:19:30 GMT -5
Nice job!
Yes, these guys on this forum are GREAT as they helped me in bedding my rifle too!
Slight imperfections (voids) in my Devcon also, but like you said, the animals don't know the difference and I don't see it from my view!!!
Made for a solid platform on which I was cloverleafing my shots and put 20 shots within a 2" circle at 100 yards....on the same day!
|
|
|
|
Post by DBinNY on Jan 5, 2010 21:06:57 GMT -5
Thanks guys. The support available from board members here is awesome. I actually bought my gun before I found this site. I remember somebody in a post once asked the advantages of the Savage and Chuck responded about the economy of the gun and how much money the poor guy would save. I responded with Right Chuck... a new barrel, recoil pad, bedding, third pillars, 11,000 different load combinations that would have to be tried... and now I'm guilty, guilty, guilty and guilty ;D. I did do all the work on the gun myself so that wasn't really a factor. My .50 barrel does shoot very well but I've never had a "custom" gun in my life and decided that had gone on long enough.
I am pretty anxious to shoot it but we've got 1 1/2' of snow on the ground here (and more on the way) and don't know when I'll get a chance.
|
|
Deleted
Deleted Member
Posts: 0
|
Post by Deleted on Jan 5, 2010 21:24:31 GMT -5
good work, its always a good feeling to venture into unknown territory and come out with a good end result. of course good advise is always a confidence builder, these gents are the best. Bet it will shoot lights out......Bill
|
|
|
|
Post by rexxer on Jan 5, 2010 21:28:56 GMT -5
Looks nice DB. Out of curiosity did you bed you trigger guard?
|
|
|
|
Post by DBinNY on Jan 5, 2010 22:06:58 GMT -5
rexxer, I did not bed the trigger guard. I didn't see any point in it because the trigger guard contacts the bottom of the rear pillar and and there's really no room for any extra compression. I'm thinking that with three pillars the only real need for the rear action screw is to retain the bolt and that pillar is now just a bonus. Anybody can feel free to express an opinion if it differs from mine.
|
|
|
|
Post by cuda on Jan 6, 2010 0:59:47 GMT -5
Did you bed it with JB weld? If so how much did you mix up to do it? Trying to get an idea for what it would take to do a tuperware stock.
|
|
|
|
Post by rexxer on Jan 6, 2010 8:53:38 GMT -5
rexxer, I did not bed the trigger guard. I didn't see any point in it because the trigger guard contacts the bottom of the rear pillar and and there's really no room for any extra compression. I'm thinking that with three pillars the only real need for the rear action screw is to retain the bolt and that pillar is now just a bonus. Anybody can feel free to express an opinion if it differs from mine. Thats what I was wondering, my rear action pilliar was short of contacting the guard. Torqueing the rear action screw would result in compressing the wood . I had to bed mine but didn't know if I had a freak!  |
|
|
|
Post by DBinNY on Jan 6, 2010 9:41:16 GMT -5
Did you bed it with JB weld? If so how much did you mix up to do it? Trying to get an idea for what it would take to do a tuperware stock. cuda, I did bed it with JB weld. I mixed up the whole of both tubes not wanting to run out during the process. In retrospect I could have gotten away with 1/2 to 2/3 as much but call it cheap insurance. I removed about about 1/8" of wood beneath the action and around the pillars and probably about 1/4" behind the recoil lug. I think I recall reading that the tupperware stocks have a magazine well that guys have filled in with hardwood blocks or I think ET may have used an aluminum block. I think this is necessary if you also want a third pillar and probably a good idea even if you don't. |
|
|
|
Post by songdog on Jan 6, 2010 16:58:22 GMT -5
Did you bed it with JB weld? If so how much did you mix up to do it? Trying to get an idea for what it would take to do a tuperware stock. cuda, I did my tupperware stock using Devcon steel epoxy and I used almost ALL of it! But, I cut away the forearm ribbing and embedded an aluminum rod to hold my ramrod. This stiffened the forearm and removed any "flexing". I was glad I did that too! I also used a "filler block" of hard oak in the magazine cavity. This saved a LOT of epoxy!!! I did "float" the barrel, but I did not add a third pillar. So far I have been able to remove my barrel and put it back on without affecting the POI, and I am not as worried about torquing the action screws like I use to. Just snug them up good as the barrel now sits on the bedding without any compression issues. Best thing I ever did, and all the guys on this forum were of great help and support! |
|
|
|
Post by DBinNY on Jan 6, 2010 22:11:35 GMT -5
RB describes the third pillar as a "convenience" and the bedding as a "more practical matter" on his website. With the bedding the action fits in the stock only one way and it is exact. Lacking a third pillar, I would simply snug up the front action screw first which has bedding both in front of it and behind it, then the rear screw and doubt you would ever have any problems. The rear action screw only has bedding in front of it so if you got that too tight initially it might tend to lift up on the front of the action.
|
|
|
|
Post by Richard on Jan 6, 2010 22:13:54 GMT -5
Don't get caught up in the "hard wood" filler! All you need is some type of "anything" for a filler. Your pillars is what is going to support your action. When you tighten the screws, they will ONLY try to compress the pillar. Not the pine or oak filler. You are just saving $$$$$ by not using all Devcon, JB Weld or Marine-Tex.
Richard
|
|
|
|
Post by rmclaughlin on Jan 7, 2010 10:58:15 GMT -5
Could someone go into detail about using JB WELD for bedding.What did you use for a releasing agent,cure time etc.I am going to do my Tupperware soon.
thanks
|
|
|
|
Post by rangeball on Jan 7, 2010 11:04:18 GMT -5
|
|
|
|
Post by dave d. on Jan 7, 2010 19:01:47 GMT -5
:)db great job...
|
|
|
|
Post by DBinNY on Jan 7, 2010 21:58:37 GMT -5
Could someone go into detail about using JB WELD for bedding.What did you use for a releasing agent,cure time etc.I am going to do my Tupperware soon. thanks I just mixed the JB weld equal parts, bedded it one day and broke it apart the next. I used kiwi neutral (no color) shoe polish which is what Richard uses and I happen to have some on the shelf anyway. A couple of mild whacks on the receiver with a plastic faced hammer and it fell right apart. Cleaned things up and put it back together snug but not tight. It's been that way for about a week and I think it's ready to go now whenever the weather cooperates. Thanks Dave. |
|
|
|
Post by songdog on Jan 8, 2010 16:58:05 GMT -5
Don't get caught up in the "hard wood" filler! All you need is some type of "anything" for a filler. Your pillars is what is going to support your action. When you tighten the screws, they will ONLY try to compress the pillar. Not the pine or oak filler. You are just saving $$$$$ by not using all Devcon, JB Weld or Marine-Tex. Richard Yes sir, that is the ONLY reason I used the wood block. A filler only! I just used the oak because it was available, plus I do admit to liking the hardwood versus softwood. That way it is there in case I want to drill through it and add a third pillar. Nothing to do about compressing the wood and all about saving the $$$$$$$$$$$$$$$ !!!!! |
|
|
|
Post by cuda on Jan 9, 2010 2:24:52 GMT -5
So I could use fiber glass body filler to fill in the mag hole. And the two deep holes by the front stock screw. Then use the JB Weld to finish the bedding job. The fiber glass will keep it light but strong and easy to remove if you use to much or if it get into the wrong spot.
|
|
|
|
Post by ET on Jan 9, 2010 7:14:38 GMT -5
Cuda
If you are going to bed the synthetic stock of course roughing and cleaning the surface where any of the compound will adhere too is necessary. But I also believe anchor holes should be employed for the compound to work into for a better-guaranteed holding bond. The anchor holes don’t need to have any real depth per say but is a recommendation I followed when I did mine.
Ed
|
|