|
|
Post by smokeeter on Dec 30, 2009 17:15:16 GMT -5
When we completed the remington .45 smokeless a carbide bushing was installed in the breech plug to try to eliminate the need to replace ventliners frequently. At that time I was asked to keep track of how many shots the carbide would take before showing signs of wear and possibly effect on accuracy. I have two plugs , each are set up for different 209 primers, one for federal 209A's and the other for Winchester. These plugs have adjustable inserts which allows for headspace adjustment. The different primers do require different headspacing. After initial testing I found for my particular rifle that the federals performed the best so I continued using that plug , I have logged over 500 shots with that plug and the .031 dia. bushing hasn't opened up at all and accuracy hasn't wavered either. Here's a pic of the two plugs 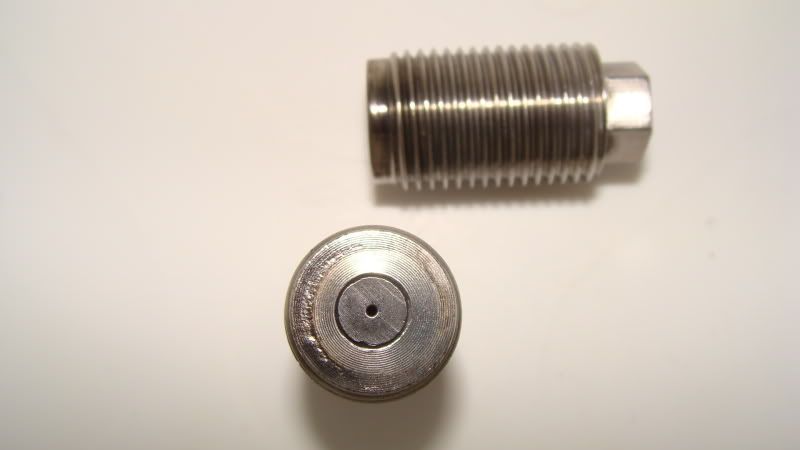 |
|
|
|
Post by rangeball on Dec 30, 2009 17:21:05 GMT -5
 Smoke, what powder and how much? |
|
|
|
Post by Dave W on Dec 30, 2009 17:43:40 GMT -5
|
|
|
|
Post by smokeeter on Dec 30, 2009 18:01:45 GMT -5
Smoke, what powder and how much? this rig is set up for sabotless and I prefer the slow burning powders, H4198 is what's mostly poured down the tube and usually up to 65 grs, depending on the bullet weight.Modest I know, but when I was using this same powder in my .50 with sabots I was changing ventliners every 30 shots max. The .45's produce higher pressures and faster ventliner wear so I'm pleased with the results so far. |
|
|
|
Post by blackhawk7204 on Dec 30, 2009 18:34:17 GMT -5
These plugs have adjustable inserts which allows for headspace adjustment. The different primers do require different headspacing. How did you make them adjustable? |
|
|
|
Post by cuda on Dec 30, 2009 19:25:47 GMT -5
Who made the bushing? And what did the bush start out as? Nice BP looks well made
|
|
|
|
Post by smokeeter on Dec 30, 2009 20:39:41 GMT -5
Al gets credit for the adjustable plug, a hardened insert is screwed into the primer end of the breech plug (which is drilled and tapped to accept it) adjustment is set for a particular primer and then the insert is locktited in place.No fooling around with screwing and unscrewing the barrel. This plug hasn't varied since it was put in , so it started as .031. 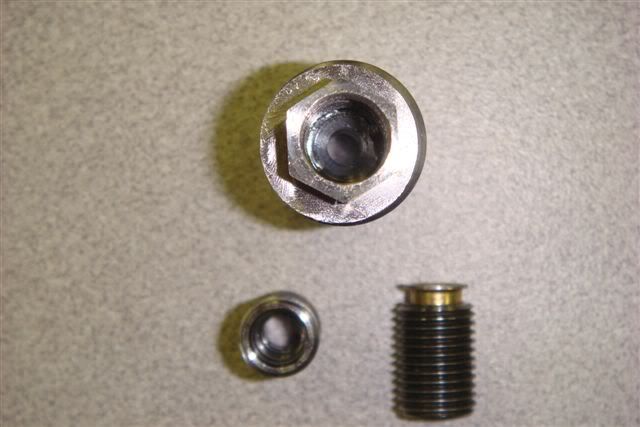 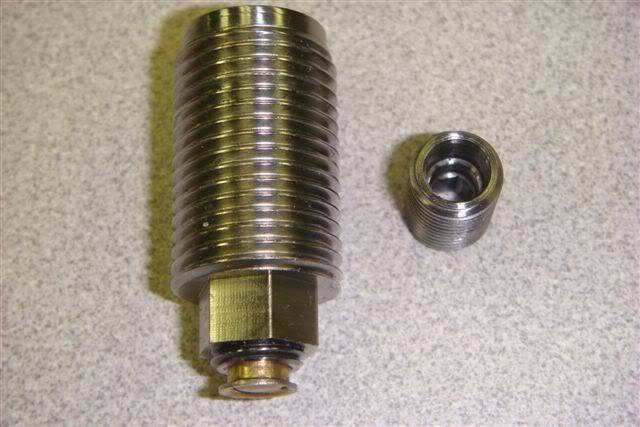 |
|
|
|
Post by tar12 on Dec 30, 2009 22:33:18 GMT -5
Very impressive! What is the costs for this marvel?
|
|
|
|
Post by jims on Dec 30, 2009 23:27:20 GMT -5
I am always amazed by good old American ingenuity. Nice.
|
|
|
|
Post by cuda on Dec 30, 2009 23:33:45 GMT -5
I bet Al did a little trial and error to get it right. But that is a great idea to make it work.
|
|
|
|
Post by Al on Dec 31, 2009 3:44:05 GMT -5
I bet Al did a little trial and error to get it right. But that is a great idea to make it work. Actually it pretty much came together on the first try. Had to come up with something easy as Smoke is 5hr hike from me, + a border crossing, which seems to always get me one of those yellow tickets for a free and complete vehicle inspection  . Once it's set for a particualr gun and primer, just jot down the OAL for future reference. If there is a downside to it, it's primer brand specific as I datumed off the radius on the primer nose vs going off the "not so flat" bottom, figured it would seal better that way. The carbide "bushing" is 3/8" long and just nipped from the shank of a worn out OSG or Hanita 1/4" carbide endmill, then EDM hole burned. |
|
|
|
Post by Jon on Dec 31, 2009 6:29:09 GMT -5
Al if you ever make another run on the carbide bushings would you concider giving me a price to make me some?
Jon
|
|
|
|
Post by tar12 on Dec 31, 2009 7:03:48 GMT -5
Al if you ever make another run on the carbide bushings would you concider giving me a price to make me some? Jon I want some as well if they are going to be available... |
|
|
|
Post by cuda on Dec 31, 2009 17:02:50 GMT -5
Al I would buy 2 or 3 if available. My son was think about a new build and I would like to try one in my savage. When you EDM the hole do you have to grind a new electrode for each? Or can the same one be used for more than one hole?
|
|
|
|
Post by mike.dawson on Dec 31, 2009 18:06:16 GMT -5
Add me to the list for 2
Mike
|
|
|
|
Post by tar12 on Dec 31, 2009 22:55:28 GMT -5
Smoke,
How do you clean out this set up?
|
|
|
|
Post by ET on Jan 1, 2010 8:28:31 GMT -5
Smoke, How do you clean out this set up? If I didn't know better I would swear they were done in an ultrasonic tank with a good solvent. ;D Ed |
|
|
|
Post by smokeeter on Jan 1, 2010 11:15:55 GMT -5
Smoke, How do you clean out this set up? I don't clean these plugs as often as some might, I've adopted Edge's philosophy on carbon crude and I believe it helps extend ventliner life. When we started experimenting with this breech plug design I was getting some erratic velocities with book loads, couldn't figure out why. Tried different sized bushings and still could not get similar velocities others were getting. With this insert/ plug there is a gap between the end of the insert and the bushing kinda like a reversed hour glass shape, I wasn't sure if this was causing the descrepancies in velocities or not, but I decided to let this area fill up with carbon crude to see if a straighter flame channel would improve things. I don't know if this is what corrected my discrepancies but the velocities settled down to more normal speeds and I haven't changed the procedure. Now to get to your original question of cleaning. I don't soak any of my breech plugs any longer ( used to use hoppes #9 overnite). I only use teflon tape on the plugs so there's no need to remove the messy silver or gold antiseize goop. I drill from the primer side of the plug with a 9/64 bit until it hits the carbide bushing, then I invert and tap out the shavings. The external surfaces of the plug are cleaned with a wire wheel on my bench grinder and a .030 welding tip cleaner is ran thru the bushing to ensure it isn't blocked . I remove and retape the plug after approx. 30 shots and just retape with teflon , cheapo white stuff, 2 wraps the heavy pink or yellow just gets cut off since the plug to barrel fit is so tight. I do the cleaning procedured after approx 100 shots. |
|
guppy
8 Pointer
 hunting buddy
Posts: 191
|
Post by guppy on Jan 1, 2010 13:19:16 GMT -5
What kind of material is the B.P. made from? The adjustable primer pocket looked like a set screw drilled out, am I right? Is the vent liner just a press fit?
|
|
|
|
Post by Al on Jan 1, 2010 14:19:26 GMT -5
Guppy, plug body is 17-4 stainless, insert is EDT150, dab of Loctite 680 and a light press. I stake mine in for a little added insurance.
I'm over by Bad Axe if your ever in the neighborhood.
|
|
guppy
8 Pointer
hunting buddy
Posts: 191
|
Post by guppy on Jan 1, 2010 15:06:31 GMT -5
You wouldn't by chance be making these at
Holland Hardware would you? (nexteer or whatever it is now)
|
|
|
|
Post by Al on Jan 1, 2010 18:04:48 GMT -5
no, I make them at work when time allows.
|
|
|
|
Post by tar12 on Jan 4, 2010 9:09:27 GMT -5
That cleaning procedure is to my liking! ;D ;D
|
|
|
|
Post by Harley on Jan 4, 2010 11:18:27 GMT -5
Well done, Al and Smokeeter.
Harley
|
|