|
|
Post by longrange on Jul 20, 2014 20:41:26 GMT -5
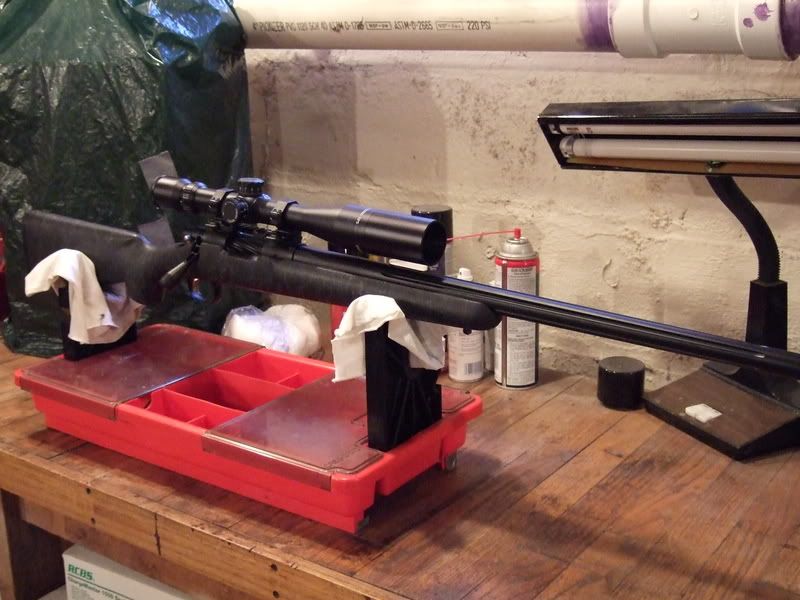
 W Well, i got my build together. Remington 700 cf action 25'' pac-nor barrel. I wanted a ram rod on it, so I put in an aluminun tube with a small bolt in the back and I screw the ram rod in. It`s not perfect but I like it. I couldn`t have done it with out this board. I`ve only shot it a couple time, just to make sure it would go bang. |
|
Deleted
Deleted Member
Posts: 0
|
Post by Deleted on Jul 20, 2014 20:44:18 GMT -5
Very nice looking rifle! Did you use Dave d's CF plug?
|
|
|
|
Post by longrange on Jul 20, 2014 21:09:55 GMT -5
Yes. I used the new style Pete's plug.
|
|
|
|
Post by 03mossy on Jul 20, 2014 21:20:03 GMT -5
Nice looking rig and good thinking on the ramrod
|
|
Deleted
Deleted Member
Posts: 0
|
Post by Deleted on Jul 20, 2014 21:48:28 GMT -5
Nice congrats
|
|
Deleted
Deleted Member
Posts: 0
|
Post by Deleted on Jul 20, 2014 21:59:52 GMT -5
Beauty of a smoke stick!
Love the stock!
|
|
Deleted
Deleted Member
Posts: 0
|
Post by Deleted on Jul 21, 2014 3:37:17 GMT -5
be careful, nobody can build just one! LOL
nice looking rig
|
|
|
|
Post by longrange on Jul 21, 2014 8:07:32 GMT -5
I used rossman's pillars and devcon to bed the action. I took about 1/2" off of the stock and put on a decelerator recoil pad.
|
|
|
|
Post by jellybelly on Jul 21, 2014 8:59:58 GMT -5
Very nice !!!!
|
|
|
|
Post by linebaugh on Jul 21, 2014 9:29:16 GMT -5
Nice build and I especially like the ramrod attached. I'm working on two builds and both will be utilizing similar aluminum tube ramrod liners that you have used.
If you could please explain the screw retainer part better I would appreciate it. I have been building mine with three sections of aluminum tube and epoxy bedding the tubes so that there is a bind on the rod when installed. If your method is better I would sure like to hear about it.
Again, great looking build.
|
|
|
|
Post by longrange on Jul 21, 2014 9:52:08 GMT -5
I don't know if my way is better, but later today I can post how I done mine,with pictures if you would like.
|
|
|
|
Post by mrbuck on Jul 21, 2014 9:58:52 GMT -5
Very nice looking gun !
|
|
|
|
Post by Richard on Jul 21, 2014 16:16:15 GMT -5
Good luck with it!
Richard
|
|
Deleted
Deleted Member
Posts: 0
|
Post by Deleted on Jul 21, 2014 16:33:37 GMT -5
somewhere there is a tutorial on doing ramrod tubes, I think. It has been done many times and in many different ways but the screw bedded in the end of the rod works very well. I use 13/32 x.014 brass tubes from K&S Engineering, stock # 0109 found at a good many hardware and hobby stores. they fit a ramrod very well and are thin enough to fit in most stocks..
|
|
|
|
Post by linebaugh on Jul 21, 2014 17:15:41 GMT -5
If it helps anyone any I have been using the high end aluminum tent poles for my liners. I actually started using them as collapsible rods utilizing the ferruls that they sell with them. Very durable rods but I got tired of forgetting them in the truck. After that I have been re-purposing them as liners.
If I remember correctly they were reasonable in price and I bought the tube and ferruls at an on line backpack supply store. One of those ultra light backpack places that sells all the light cookers and titanium cookwear and helium tents and such.
To use them I do have to ream them out a few thousandths but when I'm finished they also fit the rod with just a few thousandths clearance.
I think I get the screw part. You are mounting them in the rear and screwing the rod into them when installed. If I would have known about that prior to my present set up I may have tried it. As it is my system works well so I guess there is more than one way to skin a cat.
|
|
|
|
Post by longrange on Jul 21, 2014 18:58:32 GMT -5
Here`s how I    done mine. I red Loctite a small nut onto a bolt that will screw into my ram rod. I epoxy the nut and drive it into the aluminum tube. Then I cut off the left over sticking out. |
|
|
|
Post by Typical171 on Jul 22, 2014 15:35:58 GMT -5
Very nice!
|
|
Deleted
Deleted Member
Posts: 0
|
Post by Deleted on Jul 22, 2014 16:21:57 GMT -5
Nice Build and nice idea's here...
|
|
|
|
Post by lwh723 on Jul 22, 2014 22:15:32 GMT -5
Looking good!
|
|
|
|
Post by cuda on Jul 23, 2014 14:22:40 GMT -5
Looks like a shooter to me take it to the range and see how it groups!
|
|
|
|
Post by hcaman on Jul 23, 2014 17:10:57 GMT -5
Nice job!! what brand stock is that?
|
|
|
|
Post by longrange on Jul 23, 2014 17:53:59 GMT -5
It's a Boyd's stock.
|
|
|
|
Post by vtecgsr95 on Jul 27, 2014 6:32:31 GMT -5
Whats the best way to drill a nice straight hole in the stock?? Thats what Ive been worried about!
|
|
Deleted
Deleted Member
Posts: 0
|
Post by Deleted on Jul 27, 2014 7:50:04 GMT -5
If you use a boyds it has a channel in the center of the forarm but is not routed out on both ends, I use a Dremel with a carbide cutter to open it up. If you have access to a end mill you can do it that way too. the problem you run in to on some stocks is hitting the front stud with the tube, the trimmer the forarm profile and the thicker the tube the bigger the problem. that's the reason I use a .014 brass tube, very thin but once its bedded in the stock you will never bend it especially when the rod is in place. I have done many this way and they work well..
|
|
|
|
Post by longrange on Jul 27, 2014 7:52:34 GMT -5
I found the center of where I wanted the hole, started with a small drill bit, being careful to keep it strait then used the next size up drill bit until I had it the right diameter.
|
|
|
|
Post by longrange on Jul 27, 2014 7:58:01 GMT -5
Bill is right about the front swivel stud, I had to re-work it on mine.
|
|
|
|
Post by sagittarius on Jul 28, 2014 8:27:59 GMT -5
Nice work; congratulations.
|
|
|
|
Post by dave d. on Jul 28, 2014 9:24:56 GMT -5
Very nicely done. Look forward to the range report.
|
|