|
|
Post by dannoboone on Dec 20, 2011 17:27:19 GMT -5
Has anyone tried baking it on? Or does it just have to have a four
week curing period?
|
|
|
|
Post by spaniel on Dec 20, 2011 23:18:07 GMT -5
Depends how foolproof you need it. It has a substantial percentage of its hardness in only a couple days. IIRC I assembled and shot mine in a week, nothing has come off.
|
|
|
|
Post by dannoboone on Dec 20, 2011 23:43:26 GMT -5
Should add that the main thing I'm worried about is how soon the
action can bedded without the paint pulling off when the action is
taken away from the stock. The release agent is very good quality,
but there's quite a bit of "suction" that first time.
|
|
|
|
Post by rossman40 on Dec 21, 2011 1:13:49 GMT -5
If you can keep it like over 80° with a slight breeze around it you should see it set up pretty fast. It will actually "tack-up" within a few minutes but will still be soft. I have seen guys pull tape stencils off within a few minutes. You still don't want it thick. Your looking at like 75% hardened within a week, 90% after 2 weeks, 97% after 3 weeks and 100% after the 4 weeks.
Getting it to stick has been such a problem in the past some of the "professionals" will parkerize the parts first before applying a epoxy finish just to give the epoxy something to stick to.
|
|
|
|
Post by edwardamason on Dec 21, 2011 14:46:04 GMT -5
If you can keep it like over 80° with a slight breeze around it you should see it set up pretty fast. It will actually "tack-up" within a few minutes but will still be soft. I have seen guys pull tape stencils off within a few minutes. You still don't want it thick. Your looking at like 75% hardened within a week, 90% after 2 weeks, 97% after 3 weeks and 100% after the 4 weeks. Getting it to stick has been such a problem in the past some of the "professionals" will parkerize the parts first before applying a epoxy finish just to give the epoxy something to stick to. I had heard some were parkerizing prior to applying expoxy based finishes. I used to just bead blast stuff prior to epoxy finish. The prep is just as important as the actual application of the product. If its not preped correctly there is no way its going to last no matter how long you bake it or age it. |
|
guppy
8 Pointer
 hunting buddy
Posts: 191
|
Post by guppy on Dec 21, 2011 14:56:34 GMT -5
I'm thinking about using this on a couple builds and I have a few questions. How difficult is this? I paint my own spoons for salmon fishing and am semi meticulous with my prep. I was planning on bead blasting everything then assembling then painting, is that the way to go or do it in pieces? I've heard their airbrush is not so good, should I just get a decent one that I need anyway? Do I just say 'piss on it' and send it out? Thanks guys.
|
|
|
|
Post by rossman40 on Dec 21, 2011 14:59:16 GMT -5
Bead blasting is the preferred prep then maybe 600 sandpaper on what you can't blast. I do not know if I would separate a barrel, lug and receiver, I would probly prep and paint as a unit.
The stuff is kinda weird, even after a hour or so thinner will melt it so you can erase any "oops". You should be able to work with the rifle/parts after 24hrs. There used to be a guy around here that would do some wild paint schemes. If you thought snake skin or camo was bada$$. I thought I had a picture (can't find it) of a AR he did with flames on the handguard tube and like a "Sons of Anarchy" grim reaper on one side of the buttstock and a USMC emblem on the other. I have watched him do a digital camo job and after he lifted the stencil off, would rub down any ridges that may have happened at the edge of the stencil once it tacked up. He uses Duracoat mainly because of the color selection but told me then he thought the Alumahyde II was tougher but more expensive at $25 a can and just a few colors.
|
|
|
|
Post by killitgrillit on Dec 21, 2011 16:40:36 GMT -5
Use 120 aluminum oxide to blast with don't use glass beads.
|
|
|
|
Post by spoonover on Dec 21, 2011 18:11:04 GMT -5
Sure glad this was bought up. Was in the market for a oven, not now thanks to you men!
|
|
|
|
Post by jeremylong on Dec 22, 2011 14:57:41 GMT -5
I like it. Its kinda weird like rossman said. I use an airbrush and it works good once you get it adjusted. Its a real pain waiting for the full cure. But it sprayslooks nice and lays good. Keep a dish of acetone close by for quick cleanup. Do yourself a favor and don't fiddle with it for a couple weeks after you get it sprayed on. Its tempting but it will mar up pretty easy that first week.
|
|
|
|
Post by dannoboone on Dec 22, 2011 16:35:18 GMT -5
Thank you all for your input.
Jeremy, you're right, it will be tempting to get it finished......it has
been a long wait and one gets antsy to get it finished. Probably
won't get the barreled action back from the 'smith for a couple
weeks yet.
Ken, a co-worker who paints cars as a 2d income and uses Clear
Coat advised to get a self-etching primer (for the adhering problem),
followed by the DuraCoat just prior to the primer being completely
dry (beyond the tacky stage). Then follow up with another coat of
Duracoat. That makes me a bit nervous, but this guy knows what
he's talking about when it comes to Clear Coat. I'm wondering if
Duracoat come out the same. It would save any parkerizing type
process, but............??
|
|
|
|
Post by rossman40 on Dec 22, 2011 21:15:33 GMT -5
With the etching compound I would be worried about getting it like between the recoil lug or under the barrel nut and it keep eating. Plus the big question would be compatibility with Duracoat. They do not make a primer that I know of but they do make a clear coat specifically for it. I've played with Imron and some of the other epoxy automotive finishes but Duracoat is a different animal. They even warn you not to have any silicone in the same room or it will make the Duracoat bubble (fisheye). You can go directly to Duracoats website www.houtsenterprises.net/index.html |
|
|
|
Post by spaniel on Dec 22, 2011 23:58:13 GMT -5
I used the spray kits DuraCoat sells, no other tools required. My prep was not as good as can be done with bead blasting etc, I just cleaned it off as good as I could with the spray they provided and roughed with the roughing cloth in the kit. I had no issues with adherence.
|
|
|
|
Post by edwardamason on Dec 23, 2011 4:18:41 GMT -5
When I did this I found if you adjust the nozzle to a very fine mist and apply a base coat that is thin and place in the oven for about 10 min and repeat until u have full coverage. After the baking period I would spray it down while still hot with a really lightweight oil and let cure for 4 weeks befor I would touch it. Seemed to last a very long time like that.
|
|
|
|
Post by pmc on Dec 27, 2011 9:16:21 GMT -5
Hi, new here but have duracoated my share of rifles. I usually cure them at about 120°. Here is the setup I use currently. I built a box out of reflective coated OSB. This is the material many builders use for roof decking now. 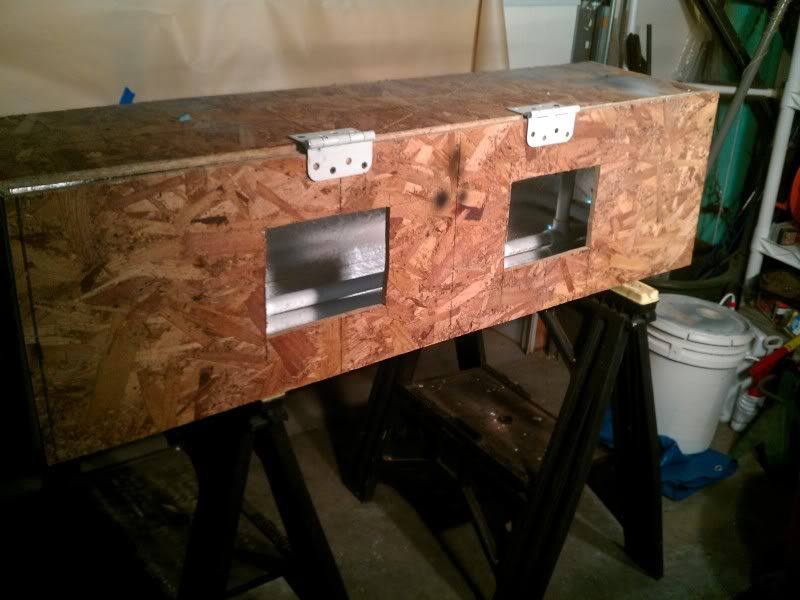 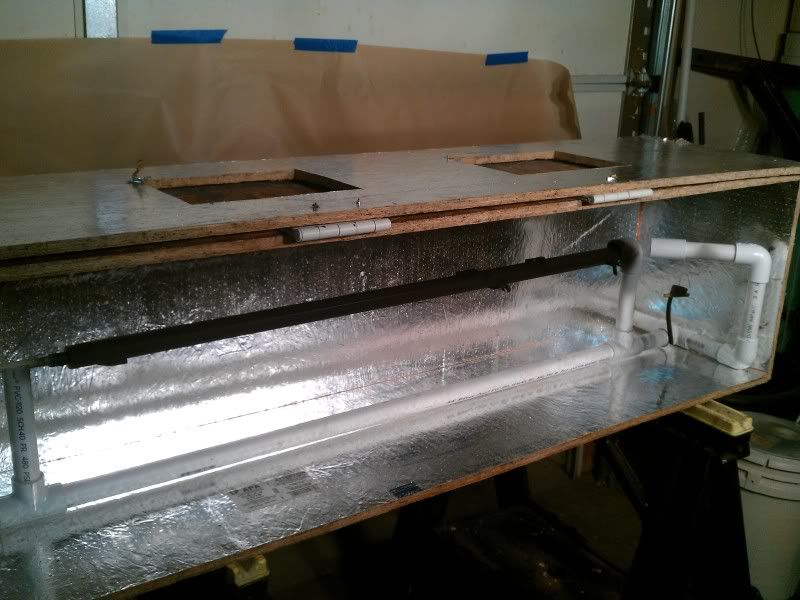 I used a couple of old hinges to make one side open. On that side I cut 2 holes the approximate size of my halogen work lights. I made a stand to hold the barrel out of some pvc and put a wooden dowel in the barrel 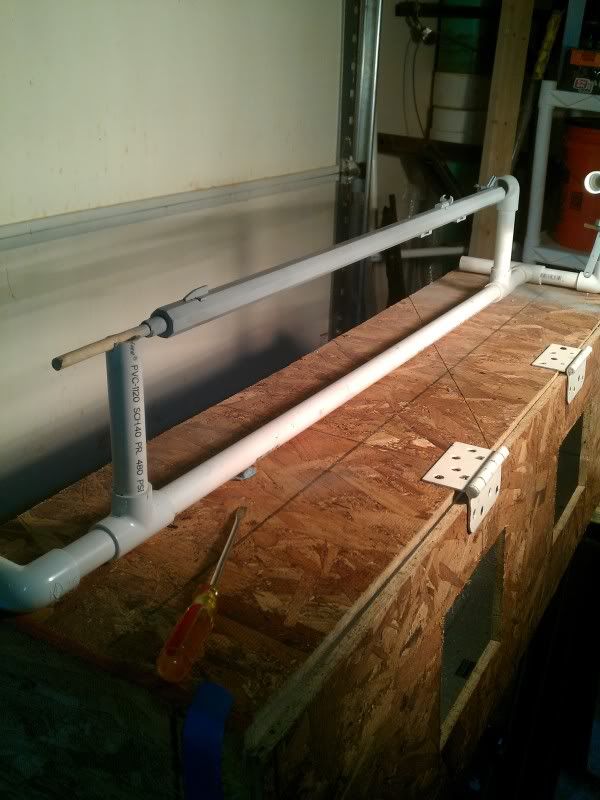 If the part isn't parkerized I will prime it before spraying. When done spraying I put the rack into the box. Put the Halogens in front and turn them on full power. 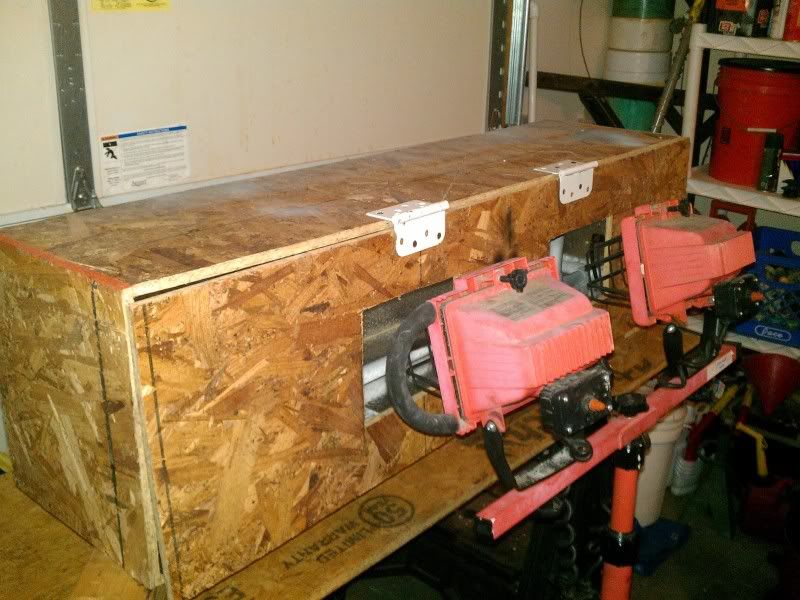 Hope that helps. Pmc |
|
|
|
Post by jims on Dec 27, 2011 11:54:15 GMT -5
Looks like a plan.
|
|
|
|
Post by dannoboone on Dec 27, 2011 14:06:52 GMT -5
That's a pretty ingenious set-up. I had thought of doing something
similar, but with a cardboard TV box. Yours would be excellent to
copy if one was planning on doing several. With me, it will be only
one. (Uh-huh, THAT's what I said when rebarraling the 10MLII to
PN .45. ;D )
pmc, what type of primer do you use? Do you take old bluing off, or
do you apply the primer over the bluing?
|
|
|
|
Post by pmc on Dec 27, 2011 19:49:55 GMT -5
I usually blast whatever I am spraying. I have also sanded them down. For Primer I use whatever metal primer I happen to have on hand out of a spray can. And when I first started dura coating I just lined a shelf with aluminum foil. It works also 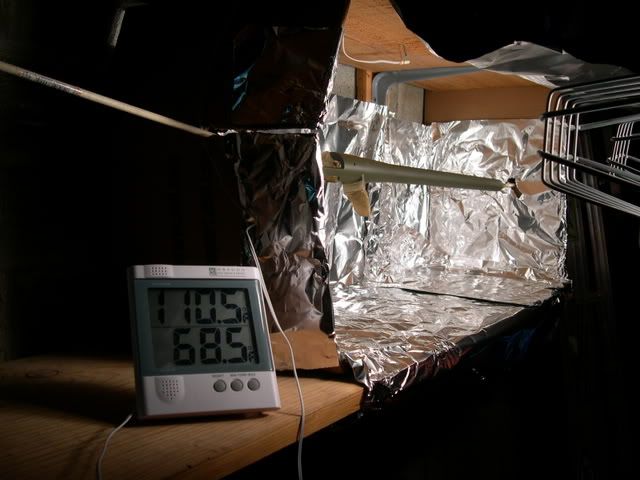 Good Luck Pmc |
|
|
|
Post by jeremylong on Jan 3, 2012 20:01:14 GMT -5
PCM - very nice. Welcome to the board. Thanks for the post! So the metal primer gets along with the dura coat ok? I was scared to try and have so far just blasted or sanded and sprayed. How long do you let them sit in the box with the lights?
|
|
|
|
Post by rangeball on Jan 6, 2012 16:24:28 GMT -5
He uses Duracoat mainly because of the color selection but told me then he thought the Alumahyde II was tougher but more expensive at $25 a can and just a few colors. Does alumahyde II have the same adhesion issues? I assume it's good to go for stainless as long as it's cleaned and degreased well? |
|
|
|
Post by rossman40 on Jan 9, 2012 9:40:23 GMT -5
Same issues which you can deal with. Supposedly the Alumahyde II is more resistant to cleaners/solvents then Duracoat once cured. I have seen Duracoat melted by cheap brake cleaner. Other then that I think the Alumnahyde is a bit easier to use and the durability, from what I have seen, is about the same. Baked on Cerakote is still tougher IMO but likes to chip on sharp corners
|
|
|
|
Post by sqezer on Mar 17, 2012 17:32:59 GMT -5
I think with the heat of the lights Id stay away from cardboard.
|
|
|
|
Post by dannoboone on Mar 17, 2012 19:06:18 GMT -5
I think with the heat of the lights Id stay away from cardboard. Correct! Wasn't planning on using halogen. |
|
Deleted
Deleted Member
Posts: 0
|
Post by Deleted on Mar 18, 2012 16:11:10 GMT -5
Danno, I used Jarhead Airsmithing for Duracoating on a Knight DISC Elite barreled action. He blasts then zinc parkerizes then I believe its 3 light coats of Duracoat. When I picked it up he said go shoot it. He said cure time is dependant on how its prepped I believe. Its been a while so do not quote me on this one. This was a blued 700ML action, bolt, trigger guard and recoil lug I had Jarhead Airsmithing zinc parkerize for a friend. Cost for just zinc parkerizing was $50 I believe  He was telling me about this one he did. The guy literally dumps bore cleaner down the muzzle and no loss of the finish when it gets on the outside paint.  His price for my Knight barreled action was $80 total. For that price it was a no-brainer. I sold it last year and the buyer really loves the Duracoat job.  I did my 700ML action in Alumahyde II and cured it with a halogen light in a cardboard box lined with aluminum foil for 4hrs I believe. (thanks to the above poster for the tips!) I think after doing it its very important to get the part to be painted with Alumahyde very warm. I scuffed with a scotchbrite pad then hit it with brake cleaner to get all the oil off. Hillbill bedded it a few weeks after I had painted it. Now, Bill said some came off but when I tore it apart I could not see any that came off with my eye..  The bolt is showing some wear but still looks very good.  |
|


 The bolt is showing some wear but still looks very good.