

Choice of Cleaning Ritual for 10ML-II
Oct 3, 2019 13:25:26 GMT -5
Post by ET on Oct 3, 2019 13:25:26 GMT -5
Everyone has their choice of cleaning method for their muzzle-loader as I do for my 10ML-II.
First without removing the plug I run a wet patch with sabot solvent down the bore. Wait for a bit and run another wet patch again before scrubbing it. Then run multiple patches with regular solvent through it followed with dry patches. As for that last ½” of bore it gets a run through with dry patch when BP is removed.
To address the original style BP, I remove the vent and run a 5/32” bit through it from the primer side to clean the flame channel. I don’t worry about a few thou of remaining carbon. Next I use a .232” bit to clean under the primer pocket. For the primer pocket itself I use a small caliber wire brush to make sure it is clean. Then a blast of air from the primer pocket side to dislodge any lose carbon. Finally, I use an old 10/32 tap to ensure threads for vent are free from any lose carbon. Reassemble BP ensuring vent threads have a coating of anti-seize.
Before I add anti-seize to BP threads, I check the mating surface for cleanliness on BP and Bore before reinstalling to ensure a good fit and reduce the risk of flame cutting or gas erosion as some call it. Once the BP is secured, I also give the wrench a reasonable rap to make sure BP is tight. I have the original 2-prong style BP wrench that I welded a socket on the end so I could use a ratchet for this operation of removing and installing BP.
Full bore cleaning is usually after 20-shots. Even though I dry swab between shots there’s still a lot of crud that comes out when full bore cleaning is done.
Note
The flame channel has a dual function. One delivering the required amount of flame/hot gas to ignite the powder. Because the orifice in the vent is a two-way path it regulates bore pressure return back into the flame channel. This space in the flame channel sort of acts as a cushion because it requires time for pressure buildup.
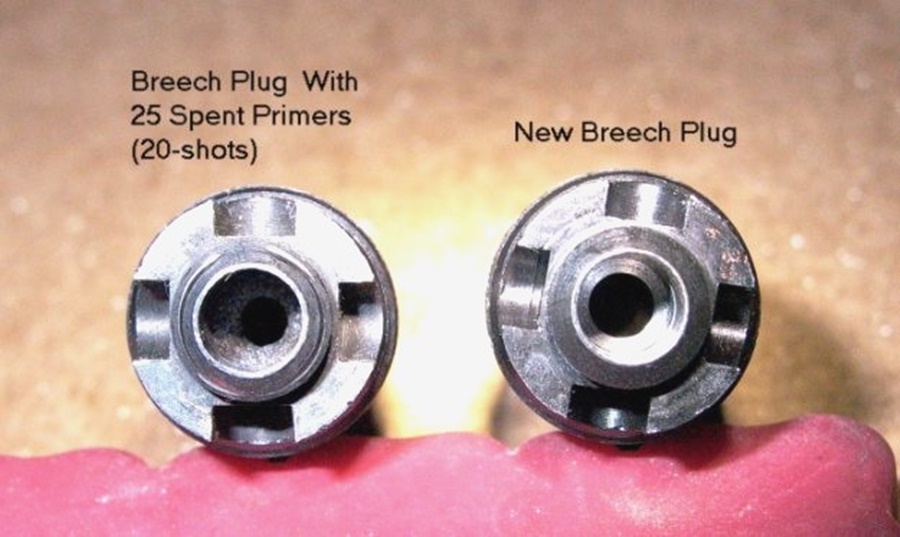
Here’s a picture that shows a new BP and one that has carbon buildup started.
Ed
First without removing the plug I run a wet patch with sabot solvent down the bore. Wait for a bit and run another wet patch again before scrubbing it. Then run multiple patches with regular solvent through it followed with dry patches. As for that last ½” of bore it gets a run through with dry patch when BP is removed.
To address the original style BP, I remove the vent and run a 5/32” bit through it from the primer side to clean the flame channel. I don’t worry about a few thou of remaining carbon. Next I use a .232” bit to clean under the primer pocket. For the primer pocket itself I use a small caliber wire brush to make sure it is clean. Then a blast of air from the primer pocket side to dislodge any lose carbon. Finally, I use an old 10/32 tap to ensure threads for vent are free from any lose carbon. Reassemble BP ensuring vent threads have a coating of anti-seize.
Before I add anti-seize to BP threads, I check the mating surface for cleanliness on BP and Bore before reinstalling to ensure a good fit and reduce the risk of flame cutting or gas erosion as some call it. Once the BP is secured, I also give the wrench a reasonable rap to make sure BP is tight. I have the original 2-prong style BP wrench that I welded a socket on the end so I could use a ratchet for this operation of removing and installing BP.
Full bore cleaning is usually after 20-shots. Even though I dry swab between shots there’s still a lot of crud that comes out when full bore cleaning is done.
Note
The flame channel has a dual function. One delivering the required amount of flame/hot gas to ignite the powder. Because the orifice in the vent is a two-way path it regulates bore pressure return back into the flame channel. This space in the flame channel sort of acts as a cushion because it requires time for pressure buildup.
Here’s a picture that shows a new BP and one that has carbon buildup started.
Ed

