|
|
Post by 7mmfreak on Aug 31, 2015 15:56:21 GMT -5
I started this project a couple of years ago when I had the lower tang lengthened and the end of the lever cut off and a square butt welded on so it looked like an 1895 Sporter. I roughed out a stock and sent the metal back for re-bluing as it had some light surface pitting when I inherited the gun. While that was done it got an action job, new crown, a trigger job, and re-chambered to .30-30 Improved 40°. After a little over a year of waiting I got it back. It had some rust in the receiver and on the barrel feed ramp from leeching bluing salts and the chamber looked like it had surface rust (he polished the chamber after bluing). It scratches up brass some and I'm not sure if it is from feeding or from the chamber. The trigger is still heavy and inconsistent. He shipped it to me without me paying and I need to send a check (I got the gun last week) but we are still negotiating the fee in regard to work done. All's well that ends well they say. The gun shoots fine and cycles fine although there is some rust I can't quite get out and the trigger is a creey 5# to 6# depending on how much creep it gives on any given break. I finished fitting up the new Ballard style stock (I still need to cut it to length and fit a recoil pad and apply the finish) for it and took it to the range after installing the Williams TK receiver sight: 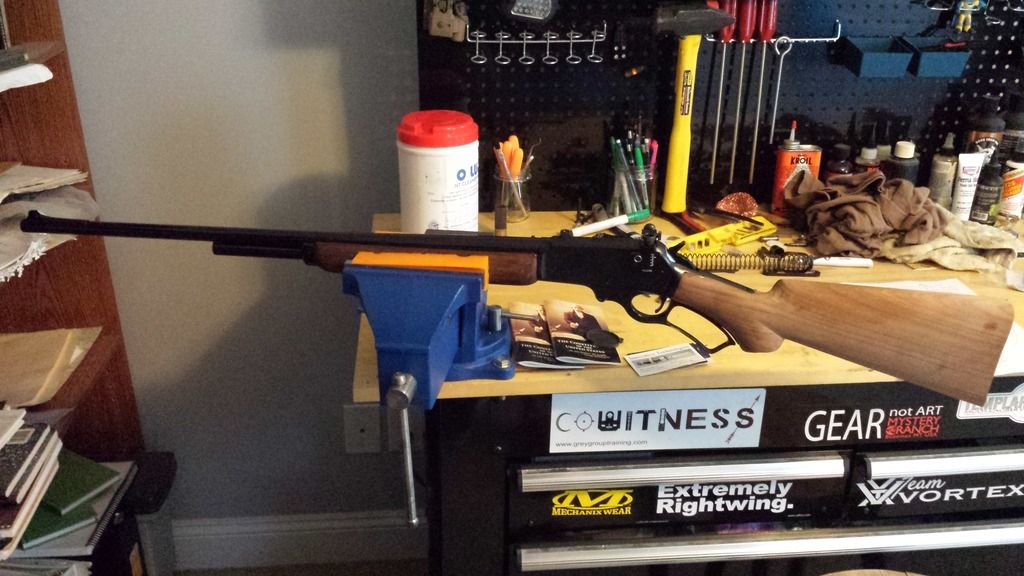 I shot a few shots off-hand at 25m to get it on paper then went to the bench at 100yds. The front sight is too short so with the receiver sight just barely clearing the receiver I am hitting about 8" above POA. It also has a bead which I don't like; I have never been able to get a sight picture that allowed for the hold I like. I prefer a blade and that is what I will replace it with since I prefer a 6 o'clock hold. Center holds work best for me with a bead front. Using a center hold I a five shot group, made a sight adjustment and figured out I needed a taller front sight. You can see them above the paper: 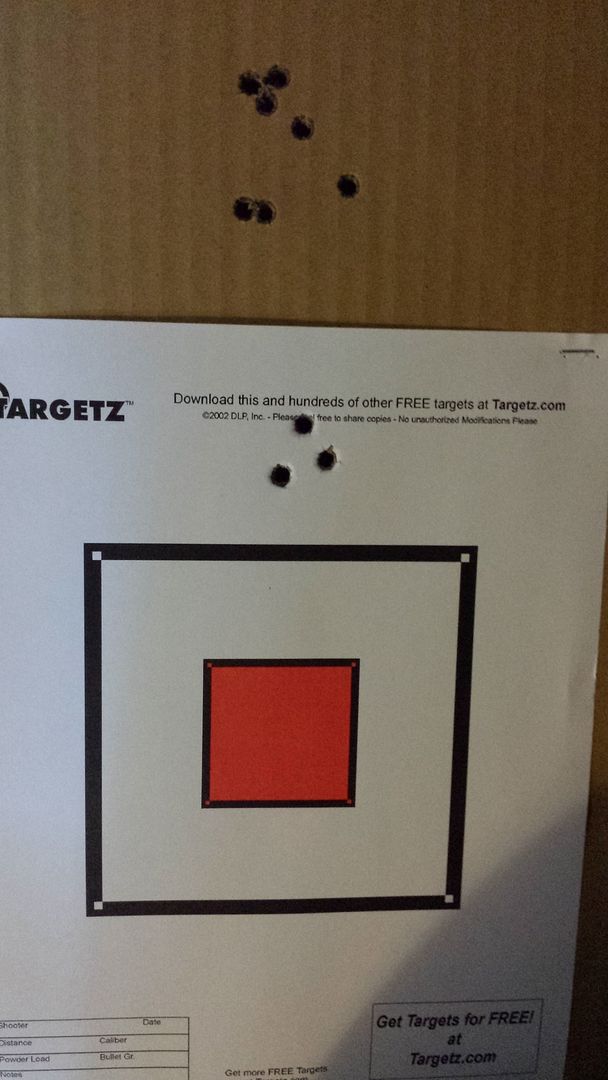 I switched to a 6 o'clock hold and shot three more (same three as on the square target but I had the reduced 600yds target pasted over it):  |
|
|
|
Post by billc on Aug 31, 2015 19:11:53 GMT -5
Very nice looking rifle!
|
|
Deleted
Deleted Member
Posts: 0
|
Post by Deleted on Aug 31, 2015 19:27:10 GMT -5
Remember that butthead that was shooting sub MOA open sights while some of us struggle even with significant magnification? Oh wait that was you!! Nice shooting and that rifle will surely be one you enjoy for a long time. I always enjoy your projects, thanks for sharing.
|
|
|
|
Post by 7mmfreak on Aug 31, 2015 20:54:22 GMT -5
Thanks, everybody gets lucky now and again. Some days you just need flannel, jeans, and a Levert gun.
|
|
|
|
Post by Dave W on Sept 1, 2015 6:22:53 GMT -5
My first deer rifle, many years ago, was a 336. I didn't shoot it as good as you do.  |
|
|
|
Post by mrbuck on Sept 1, 2015 6:51:45 GMT -5
My 70's vintage Marlin 336 in.35 Remington shoots sub MOA with 200gr. Remington CoreLokts and an old Lyman accuracy load of 38.0grs. of IMR4320 ..... however it took a trigger job and a 2.5-8 Leupold to get there .
Excellent shooting with very sharp eyes !
Chris
|
|
|
|
Post by schunter on Sept 1, 2015 7:00:58 GMT -5
Beautiful little lever gun. My first deer rifle was a Marlin 35. Thanks for sharing.
|
|
|
|
Post by 7mmfreak on Sept 1, 2015 10:58:47 GMT -5
Funny y'all have so many .35's because I really want one. One of my favorite rifles was a .350 Rem Mag and I'd like to have a 336 in .35 Rem or .35-30 Improved.
|
|
|
|
Post by mrbuck on Sept 1, 2015 17:26:59 GMT -5
The .35 Remington is " the " cartridge in the Remington 760 and Marlin 336 for Old School Yankee Deer Hunters in their black and red wool coats and green wool pants .
Famous Texas deer hunter , John Wooters , used a Remington 141 in .35 Remington in his early hunting days in the thickets of East Texas .
Chris
|
|
|
|
Post by 7mmfreak on Sept 10, 2015 15:46:53 GMT -5
After doing the math I found there was no sight of the correct height to get me where I needed to be for proper zero while keeping the receiver sight sitting low. I ordered a Skinner Partridge that was .500" tall and will file it down to correct height once I get load development done with this rifle. I had to take .013" off the dovetail with a triangular file to get it to fit: 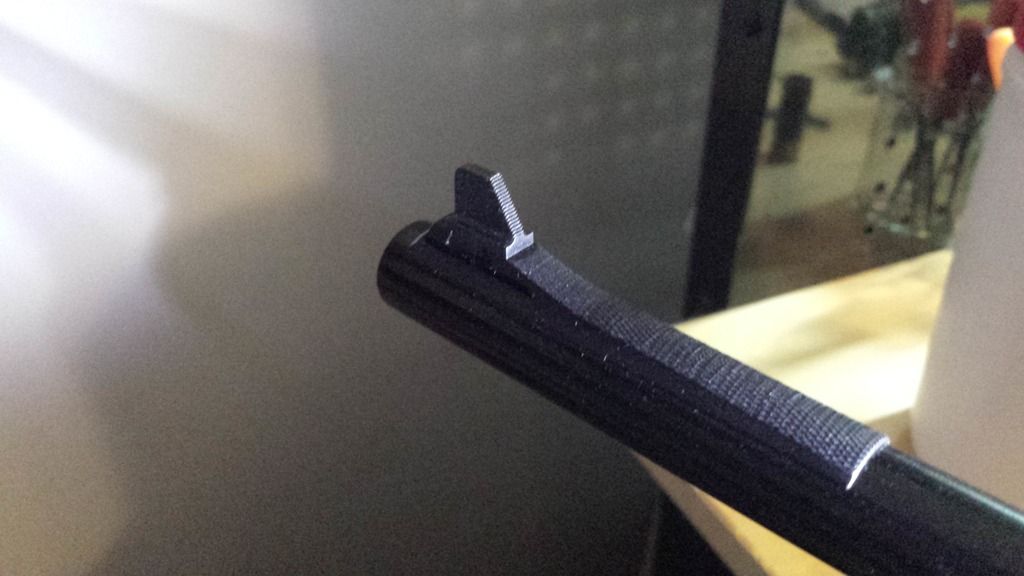 Old sight punched out with Skinner punch (well made if you need a sight punch that is brass): 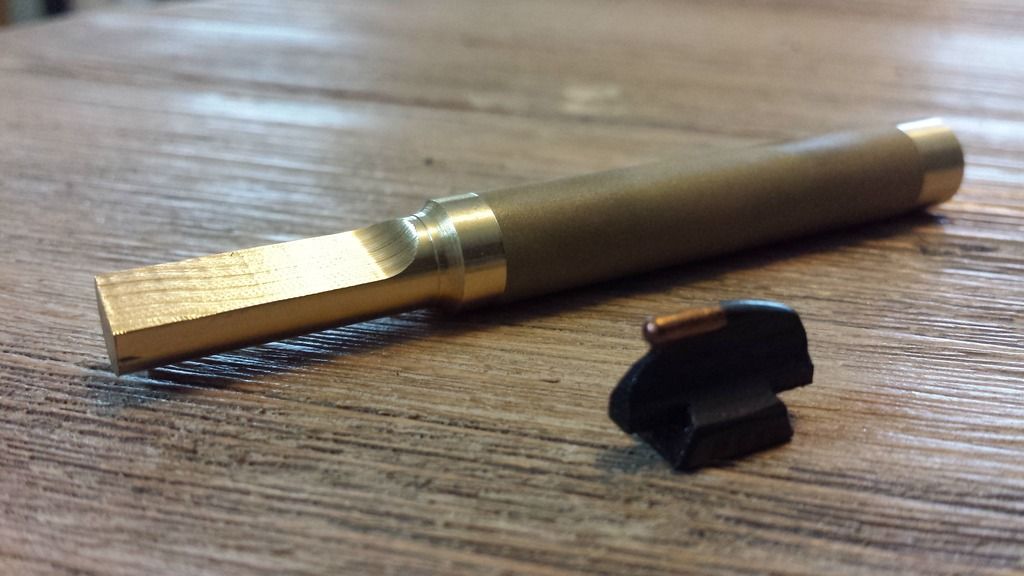 My range is shut down for maintenance today so I hope to get a chance to shoot it tomorrow or this weekend because I will be gone for another week starting Monday. |
|
|
|
Post by mrbuck on Sept 10, 2015 19:25:17 GMT -5
Very nice work .
Chris
|
|
Deleted
Deleted Member
Posts: 0
|
Post by Deleted on Sept 10, 2015 20:12:35 GMT -5
Nice work keith. You need some kind of small mill to help you out! Great attention to detail to get that knocked down by hand and keep a great fit. Not quite 10+ rifles in 24 days but actually believable work!
|
|
|
|
Post by 7mmfreak on Sept 10, 2015 20:28:16 GMT -5
Cole, if I every get to making money on bullets a small shop with mill and lathe is a top priority.
|
|
|
|
Post by 7mmfreak on Sept 11, 2015 15:51:57 GMT -5
I went out to work down the sight and fire-form another 50 rounds for the gun. I still have another 15 to fire-form because I quit when a thunderstorm rolled in. Nothing as spectacular as last outing but I got the sight centered up. Top group is 2.2", center group is 1.8", and bottom group is 2.1": 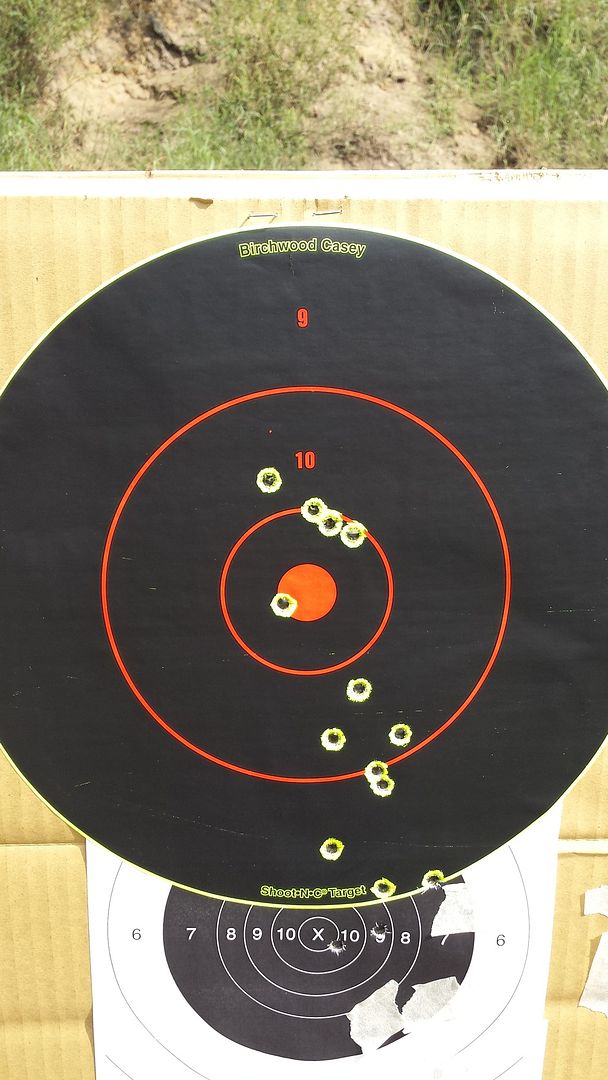 I took it out to 300yds just for gigs. I marked off all the existing holes on the target backer with a sharpie marker. I shot two sighters and was about 2 minutes low so I dialed up and let five loose. From the round at 11 o'clock to the round at 7 o'clock is 13.5" but the three just left of center are 1.3". I would like to say it was the 6# trigger but since it is all elevation I'm guessing it was an error in my hold. I needed a little bigger target since this one just looked like a small dot on top of my post: 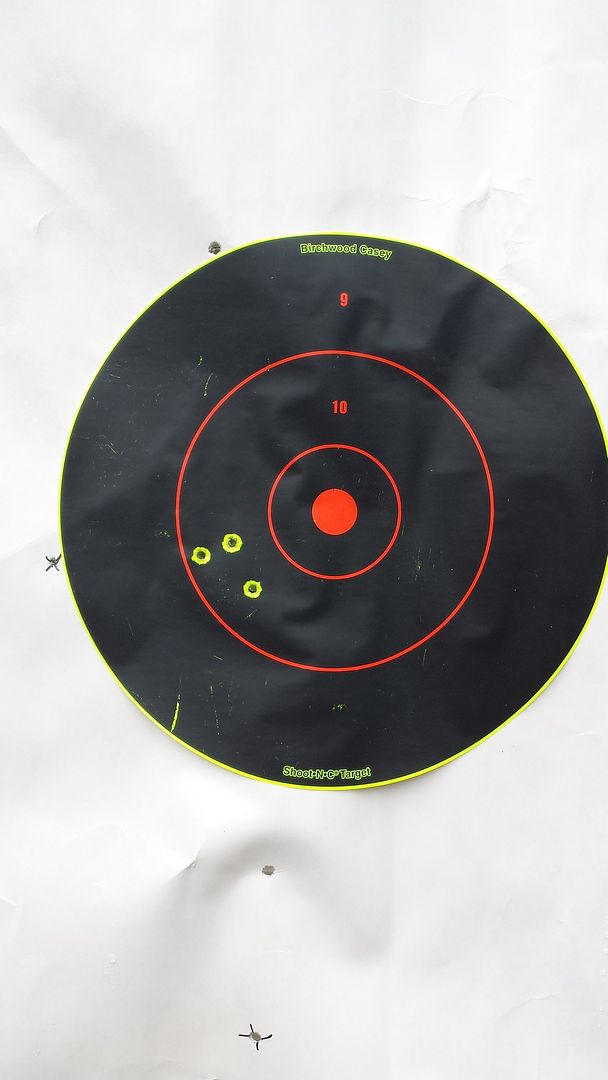 |
|
|
|
Post by timgunner on Sept 23, 2015 12:02:58 GMT -5
That's dang good shooting for a 6# trigger and open sights at 300 yards! You might try Evapo-rust inside the action but be careful I don't know if it reacts with rust bluing or not?
|
|
|
|
Post by 7mmfreak on Sept 23, 2015 13:12:32 GMT -5
Thanks. That trigger definitely needs work. I was shooting it again today and I have to go through at least two breathing cycles to break the trigger it is so heavy. I feel like I did 60% good shooting and missed 40% of the time at 300yds but it was fun. I don't have any business shooting at a deer with it at 300yds though. Evapo-rust will remove bluing. I just polished it out as best I could and keep it oiled up.
|
|
|
|
Post by 7mmfreak on Sept 24, 2015 15:43:01 GMT -5
After fire-forming 100 Federal factory rounds I gave the bore a good cleaning. I removed a ton of carbon fouling but there was very little copper coming out the barrel. This is a 1953 gun with 4-groove rifling and it appears to be quite good. I loaded 5 rounds each of BL-(C)2 at 37 to 39 grains in .5gn increments under a Hornady 150gn RN Interlock bullet with a Fed GM210M primer. This is the first five rounds out of the clean barel with 37gn of powder and measures 1.402" center to center: 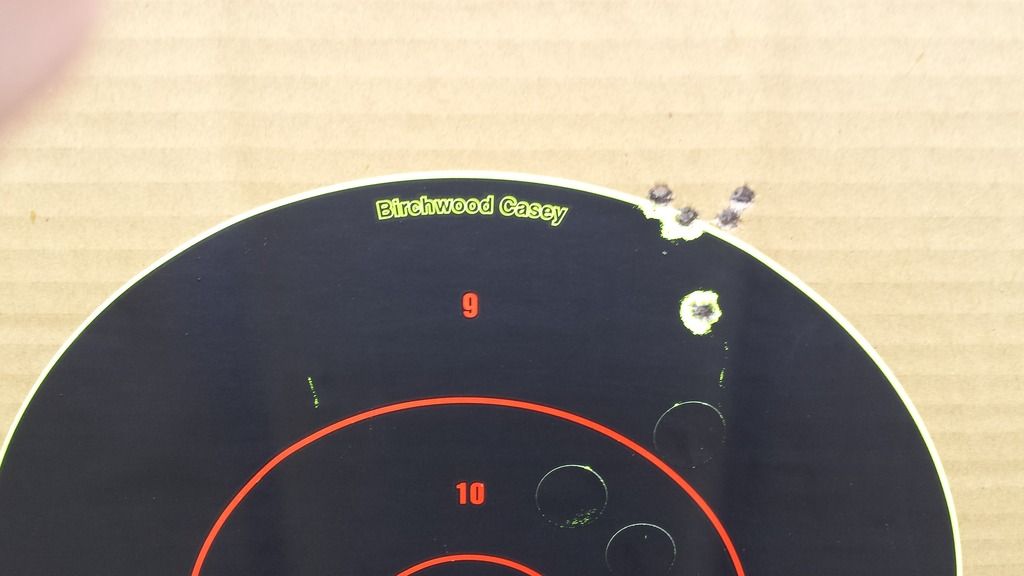 The rest of the groups were about double that size so I loaded up another 25 rounds at 37gn for testing and probably a little hunting. I need to order a Wolf reduced power hammer spring because at 6-7# I go through at least two breathing cycles to break the trigger and it is starting to really irritate me. Half the time I end up glancing down at the hammer to see if it is actually cocked even though I know it is. |
|
|
|
Post by mrbuck on Sept 24, 2015 16:02:00 GMT -5
Enjoying your work with this 1953 classic rifle . My gun show bargin 336 needed a trigger job to break at slightly less than 3 pounds . Great shooting . Can't wait to see pictures of the finished rifle .
Chris
|
|
|
|
Post by 7mmfreak on Sept 24, 2015 19:29:01 GMT -5
One thing I forgot to add in the event any of you ever try a .30-30 Improved (or any improved for that matter). Sizing sharp shouldered cases can be an issue and with a sizing die you can can give the shoulder a slight bulge that prevents chambering. I figured that out when I started with the .280 Improved when I was about 18. So, I just barely bump them and measure shoulder junction diameter as I make each die adjustment. The issue that was new for me was collapsing shoulders when seating bullets. The .30-30 brass is very thin and when I was setting up my dies and making a dummy or three I started collapsing shoulders which caused the shoulder/body junction to bulge up to .025" or so.
If you ever run into this get either a Lyman M die or Lee Expander and just bell about 1/16" of the neck. You will likely only get .001" of constriction/tension after you do this so you will need some sort of crimp die. I am using a Lee Factory Crimp to just barely touch the portion of the neck that got expanded by the M die.
|
|
|
|
Post by 7mmfreak on Sept 28, 2015 6:39:16 GMT -5
I took my trigger assembly apart. The sear retains its original angle so I'm not sure how much trigger work I actually got. I decided to bend the return spring before cutting the sear. That alone cut 25% off the weight and it feels much better. I'm going to hit the range this morning and see if it needs more work.
|
|


