|
|
Post by Richard on Mar 30, 2009 19:00:33 GMT -5
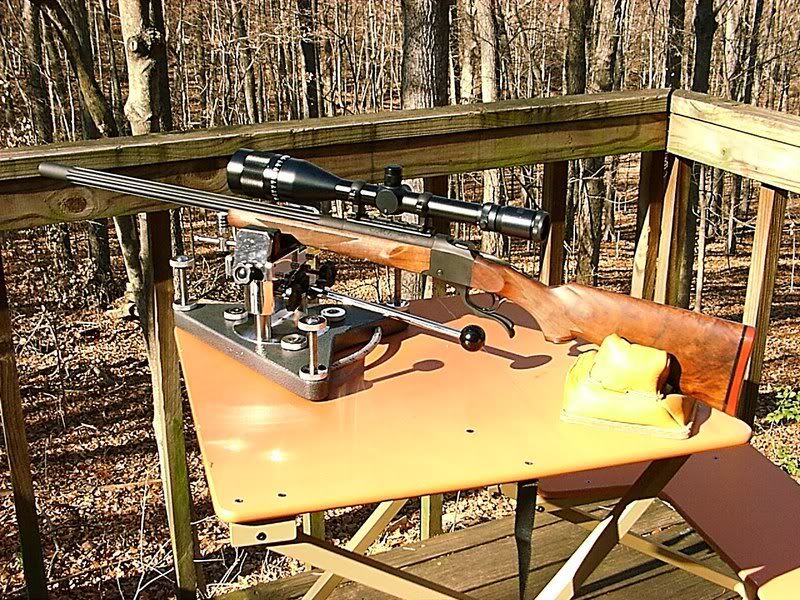
what it is: As new shooters appear on this forum from time to time, I thought an illustration of what a third pillar is and the reason for having it.  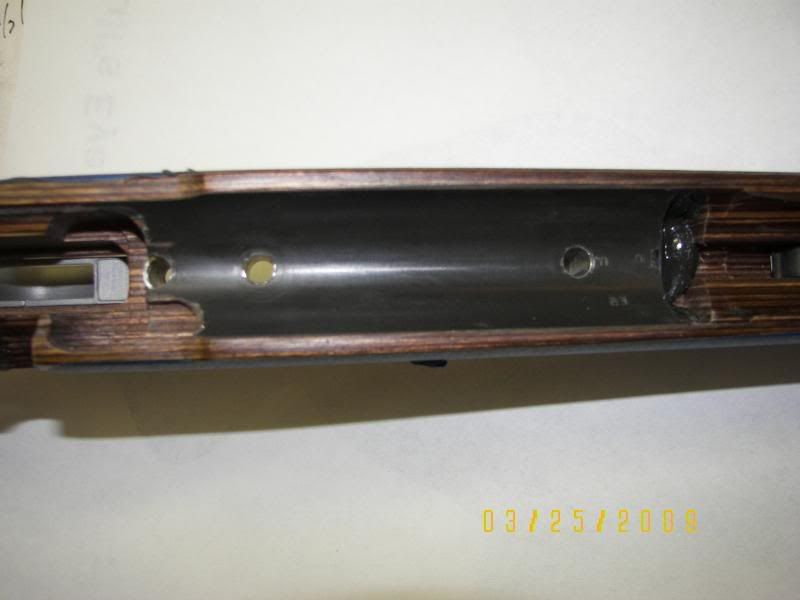 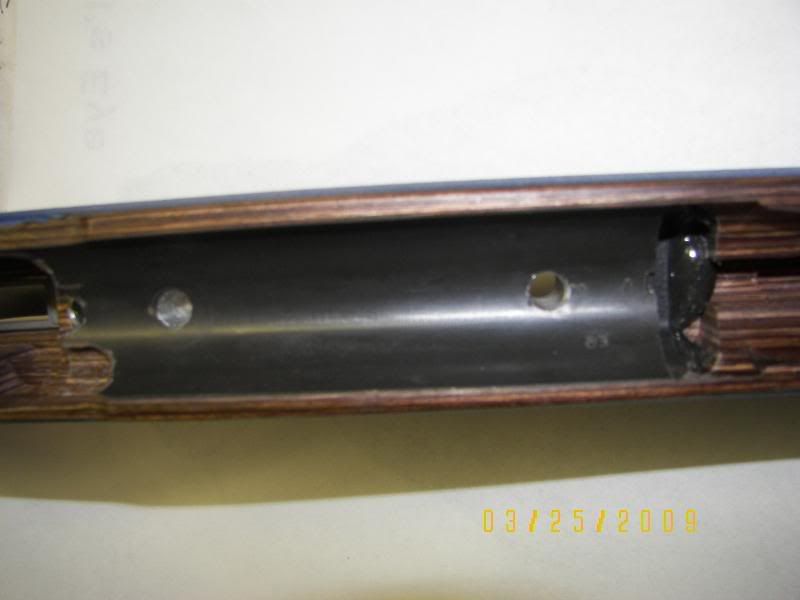 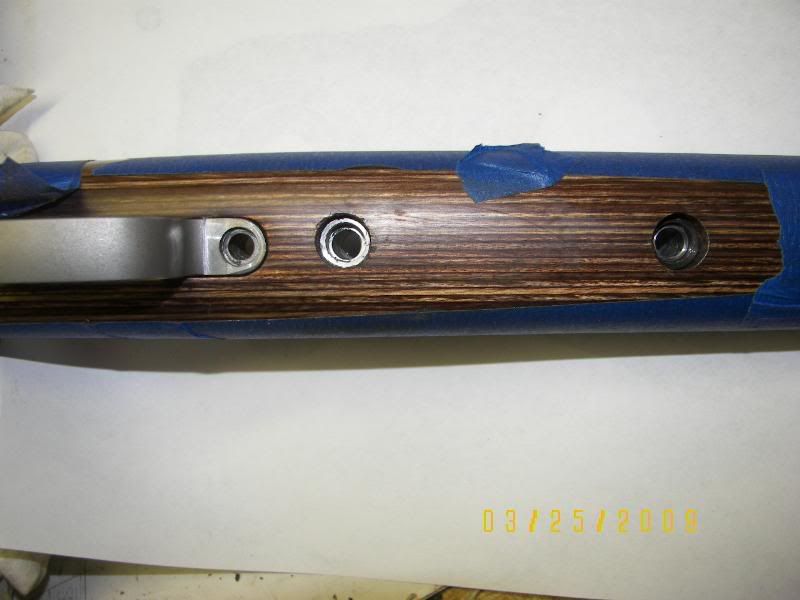 The third pillar is actually the middle one of the three. The forward one is the Savage original as is a normal screw thru the front of the trigger guard. What you see in the picture is the Knurled thumb screw I replace it with. So, the middle screw is actually the "third pillar". All of the Savages come with two pillars from the factory. By adding the third pillar, you are able to secure your action in the stock with those two forward screws. You Will also not how everything from the rear screw to the recoil lug has been bedded. This bedding is a 100% mimic of the bottom side of your action including the rear face of the recoil lug. The sides, bottom and back of the lug are relieved. Only the part of the lug that faces the butt makes contact. Now with your action secured in the stock, it is a simple procedure to simply turn the "thumb screw out two turns, by hand, and your bolt can be removed. Richard Not sure if I should have put this post in the other section? Move it if necessary. |
|
|
|
Post by KerryB on Mar 30, 2009 19:33:49 GMT -5
Good photographs! This is dealing with third pillaring a Savage 10MLII, so it is in the correct forum. Thanks for taking the time to illustrate this for us. KerryB
|
|
|
|
Post by rexxer on Mar 30, 2009 21:17:04 GMT -5
Real nice Richard and good idea! I wish we had a place to put some of this stuff. I can see a newbie looking at this site and thinking this smokeless stuff is way over my head. At least with pictures it can break thing down so its easier to understand. Nice Job!
|
|
|
|
Post by ET on Mar 30, 2009 22:14:21 GMT -5
Richard
Neat and simple to follow. Nicely presented.
If anyone is going to do a full receiver bedding I would recommend they also add the third pillar. I'm glad I did.
Ed
|
|
|
|
Post by wilmsmeyer on Mar 31, 2009 4:10:11 GMT -5
The 3rd pillar option is the way to go...however there are ways around it. There are, however, no ways around not bedding an action.
Nice pictures and easy to read logic for the new guys.
|
|
|
|
Post by jeff on Mar 31, 2009 7:13:02 GMT -5
Why do you releve the front and side of recoil lug?
I have always bedded the nut and all. I guess thats why I have a grocery store and not a gun shop. ;D
thanks Jeff~
|
|
|
|
Post by onecardchuck on Mar 31, 2009 11:08:13 GMT -5
jeff,
You can bed the barrel nut and so far up the barrel, but if you ever have to change your barrel or do some work on it and then put it back on the nut may not return to the exact same position as the bedding grooves. You will then again have to bed the barrel nut.
Richard,
Man that is pretty I am glad my setup looks just like that. You do great work and I have been extremely happy with it.
|
|
|
|
Post by Richard on Mar 31, 2009 13:49:28 GMT -5
Thanks onecard and the others............
Jeff.........The part of the lug that faces the butt is the only part that resists the rearward thrust. Also, if all sides were fully bedded, getting the action in and out of the stock would not only be a pain in the arse, but you would be constantly chipping and breaking away the bedding compound most every time you remove the action. Just scrape off a tiny piece of bedding and have it land in the bottom of the lug recess and you no longer have a perfect fit of receiver to action. If I bed the barrel nut and maybe an inch or two forward on the barrel, (I do this on long barreled rifles that have short tennons: i.e. Remingtons) I still relieve the area around the recoil lug for easy disassembly.
Richard
|
|
|
|
Post by younghunter86 on Mar 31, 2009 15:05:42 GMT -5
Richard-
That looks great! I'm going to try and bed my savage once my .45 arrives. I don't think I can do any worse than the guy at scheels did. I figure sooner or later I need to know how to do it. I'm just hoping I can get mine back off the stock to see how well I did!
|
|
|
|
Post by Richard on Apr 1, 2009 18:51:53 GMT -5
Younghunter.........Just don't forget to put release agent anywhere you don't want the epoxy to stick and you will be OK!  Richard |
|
|
|
Post by olsmokey on Apr 1, 2009 19:26:52 GMT -5
Richard; What did you use for the screw? and where did you get it? Dave
|
|
|
|
Post by dougedwards on Apr 1, 2009 19:44:32 GMT -5
Is the total purpose of adding the third pillar to make it easier to remove the bolt or does it also provide some stability between the stock and the action?
Doug
|
|
|
|
Post by olsmokey on Apr 1, 2009 19:54:23 GMT -5
I would have to say it's more for stability. My Savage FTR has the 3rd pillar installed from the factory. It's purpose is to keep the action secure and stable while removing the bolt.
|
|
|
|
Post by Richard on Apr 1, 2009 20:09:51 GMT -5
olesmoke....Its a 1/4x28x2" cap screw. I make the little knob on the lathe and drill it slightly undersize and press it on. It has to be trimmed a coule of tenths shorter and turned down at the tip to fit the channel on the bolt. I had fit each one.
Richard
|
|
|
|
Post by fishhawk on Apr 1, 2009 20:19:20 GMT -5
I'm not sure if olesmoke is refering to Richards front guard screw or a screw for a third pillar but I just sent rexxer an extra third pillar screw I had. The ones I got were ordered from my local Fastenal store. I tried to get their stock# but their site is down. It was listed under "button head screws". They are stainless and the fine 28 just like the savage screws but are fully threaded. the head is slightly wider than the savage and may need sanded domn in a drill to fit into some counterbored pillars. 1/4-20 coarse are much easier to find if you want to tap that one hole different.
|
|
|
|
Post by fishhawk on Apr 2, 2009 12:17:58 GMT -5
I found the SKU#'s for third pillar screws at fastenal>1"-73770>1.25"-73771>1.5"-73772. These are stainless 1/4-28 allen head.
|
|
|
|
Post by jims on Apr 2, 2009 13:51:35 GMT -5
Fishhawk: Thanks for supplying those numbers to us here.
|
|
|
|
Post by screwbolts on Apr 2, 2009 16:10:43 GMT -5
|
|
|
|
Post by Richard on Apr 2, 2009 18:47:09 GMT -5
Watch out!!!!! For that price, they are going to be "dead soft." Look them up on MSC or Graingers site and you will see their hardness rating.........38 to 43 Rockwell C. The Fastenall site lists no Rockwell rating. They would be strictly used for light duty assembly. Graingers price per 100 is more like $14.00
Richard
|
|
|
|
Post by screwbolts on Apr 2, 2009 19:44:08 GMT -5
Hi Richard, the Fastenal site has there specs listed as" Product standards" it opens a PDF file and they are HCR 39 to 44, they also have Holo Krome, and they are listed under there spec sheet as the same HCR 39 to 44, I already have a Box from, McMaster Carr,
This is the spec page:
Fastenal Product Standard: FNL.FHSCS.ALLOY.BO
Page 1 of 1 November 24, 2008
This document was printed on 3/2/2009 and was current at that time. Please check current revision date to avoid using obsolete
copies.
Socket, Flat Head Cap Screws, Alloy, Black Oxide
The information below lists the required dimensional, chemical and physical characteristics of the fasteners in this purchase order. If
the order received does not meet these requirements, it may result in a supplier corrective action request, which could jeopardize your
status as an approved vendor. Unless otherwise specified, all referenced consensus standards must be adhered to in their entirety.
H J T F
Head Height Hex Socket
Key
Engagement
Fillet
Transition
Dia.
Protrusion Gage Dia. Protrusion
G
Size
D
Body Diameter
A
Head Diameter
Specification Requirements:
• Dimensions: ASME B18.3
• Material &
Mechanical Properties: ASTM F-835
• Hardness: < ½” diameter is HRC 39 to 44.
> ½” diameter is HRC 37 to 44.
• Thread requirements: ANSI B1.1, Class 3A UNRC and UNRF (0.060” to 1” inclusive)
Class 2A UNRC and UNRF (Over 1”)
• Product Marking: Manufacturer’s ID on sizes #4 and larger
• Finish: Thermal or Chemical Black Oxide
• Material Test Reports: The MTR must have documented lot traceability, including full
chemical and mechanical figures, to the specification(s) above
|
|
|
|
Post by Richard on Apr 2, 2009 19:55:41 GMT -5
Screwbolts.......OK, I'm with you on that. I just opened the site you gave, and did not see any spec's, thats the reason for my comment. Good price.
Richard
|
|
|
|
Post by screwbolts on Apr 3, 2009 8:12:35 GMT -5
When I saw the Price I was very skeptical, then I started looking for the specs, Most sites list them with the product listing but they have a Tab that takes you to there PDF files, the PDF for the Halo Krome was even set up different and did proudly say the Halo Krome is American made. $4.30 gets you imports, I did delete some of the spec sheet to make the post shorter.
Ken
|
|
|
|
Post by safteyadamant on Jan 1, 2020 12:02:30 GMT -5
Hello. I just bought a brand new "Savage Factory" laminated wood thumbhole stock for my year 2001 Savage 10ML-II with synthetic stock. I don't want to break any rules, so send a PM for the link to the $101 NOS stock. I am going to correct the hyperbole falsely advertised falsely labeled "factory pillar bedded" problem. The factory steel pillars do not touch the bottom of the receiver; not even close with a big visible gap. The factory installed pillars are merely metal tubes that the stock screws pass through. The trigger guard touches only wood. The receiver is beautifully perfectly inletted but only touches wood. I am going to add a third pillar. I am also going to full bed the receiver, tang, and a part of the barrel. But ... ... right now I am in the research stage. I am going to do all the work myself. I would appreciate all advice and photographs since this thread does not appear to be closed. The Photobucket photographs in the below post are all blurry. thanks
|
|
|
|
Post by mrbuck on Jan 1, 2020 13:57:38 GMT -5
To the best of my knowledge , the tang on a Savage MLII is left floating and doesn't contact the stock .
Chris
|
|
|
|
Post by safteyadamant on Jan 2, 2020 5:02:01 GMT -5
Thanks. By the "tang" I assume you also mean the "recoil lug". I don't know which is the best word to use. I use both words to mean the same part. I have read lots of bedding advice and unfortunately there are differing opinions. I have taken all that advice into consideration and decided to relieve (or clearance) the entire space around the tang. I am going to do a two step process: 1st bed to actual supporting pillars; 2nd bed everything else. I am going to use tape on the tang sides, front, and bottom so that the bedding fully supports only the back of the tang. I still need good pictures to see the positioning of the middle Third Pillar. I mostly want that middle pillar so that the newly created "two front pillars" will support the action in a fixed position so that I can remove the original back most action screw to remove the bolt for breech plug removal and convenient inspection and maintenance.
|
|
|
|
Post by mrbuck on Jan 2, 2020 6:16:24 GMT -5
Hang on !! I do not mean the recoil lug ! The "tang " that I refer to is the very rear of the action that has the thumb safety . Call Bill Ball he can give you expert advice . His number is at the top of the page . He did bedding and pillar work on my MLII when I got a new Savage laminated stock .
Chris
|
|
|
|
Post by ET on Jan 2, 2020 10:14:07 GMT -5
Safetyadamant First off if you could try and use correct terminology it will make it easier for others to follow what you are conveying. I enjoy seeing enthusiasm for learning something new but this project is not as simple as you think. This is not to discourage you but make you aware that careful planning needs to be implemented to avoid pitfalls. This was also my first bedding job with the addition of the third pillar. The extra pillar is 7/8”, center to center from the rear hold down screw. Good luck with your project. 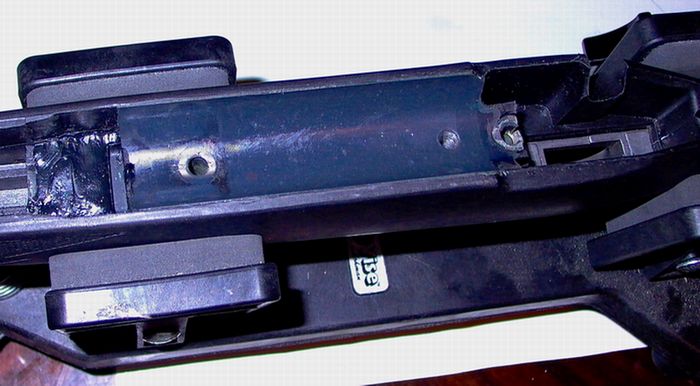 Ed |
|
|
|
Post by jims on Jan 2, 2020 13:05:09 GMT -5
The spacing is not especially critical. Many use a 1 inch spacing. Either way it is a beneficial addition.
|
|
|
|
Post by safteyadamant on Jan 4, 2020 19:49:50 GMT -5
Hello, I do appreciate all the advice. I stated I am in the research phase with my very first ever bedding job. I suppose my incorrect nomenclature gave that away pretty fast. The receiver tang is at the rear end of the receiver and the recoil lug is at the front end of the receiver at the intersection of the barrel. I am going to be more careful and pay attention to everyone's advice. I am going to practice on junk metal and junk wood until I am more sure of my abilities. I have ordered a lot of supplies and the Forster Universal Sight mounting jig. I need the jig to install a sight on my shotgun. I plan to use the Forster Jig, and my Powermatic drill press, drill press cross vise, etc to help me make a drop in "receiver jig" to align the third pillar spacing and perpendicularity alignment. I am going to have fun this cold winter until next Muzzleloader season. Hmm, wait, that will still be fun. So I am having fun preparing to have more fun.
|
|
|
|
Post by ET on Jan 4, 2020 20:24:55 GMT -5
Safetyadamant
The only additional advice I can offer is to angle drill the hold down holes for the bedding. This will provide a better hold of bedding to stock.
Ed
|
|