The pre-Accutrigger 10ML trigger
Aug 11, 2009 21:36:57 GMT -5
Post by rossman40 on Aug 11, 2009 21:36:57 GMT -5
This “How To” covers the pre-Accutrigger trigger which was on most Savage 110 series rifles until the 2003 model year. The trigger remained pretty much the same from the 50s, with a slight upgrade around 1966 and more modifiacations in the 80s. In 2003 it was replaced with the AccuTrigger on Savages but still lives on in the Stevens 200. Some set screws came and went and then came back. Also material used in the safety bar and trigger went from milled steel to a sintered metal using a Metal Injection Molding (MIM) process. Until the AccuTrigger the trigger on the Savage was considered the worst feature on the rifle. You have to remember this is not a target trigger; it is tough to get it to operate safely below a pull of 3 pounds. If you want a pull of less then 3 pounds then you better stop here and go order you an aftermarket trigger. The goal here is to explain the function, adjustment and what you can do to smooth the operation with just a little elbow grease.
The main difference between the AccuTrigger and the older one is the trigger bar, or as Savage calls it the AccuRelease lever. The thumb safety on both models blocks the trigger. With the older model if the sear dis-engages or drops the gun will fire. With the AccuTrigger the AccuRelease lever catches the sear unless it is depressed. So if by chance the rifle is dropped or jarred heavily enough to dis-engage the sear the AccyRelease lever blocks the sear from dropping completely. How safe is it? Supposedly when the engineers showed the AccuTrigger Savage Arms owner and CEO Ron Coburn’s test was to be lifted 20 feet by a forklift and he threw the rifle to the floor, it passed the test.
Just a bit of Savage history, people ask why was the trigger so cheaply made. The goal of the Savage design team was to come up with a quality rifle at a good price. Even the model number, 110, reflected the goal of a rifle with a MSRP of $110 (1950’s dollars). A lot of the innovative ideas such as using the barrel nut to set headspace, the floating bolthead and use of simple parts were employed to reduce manufacturing cost. Instead of every part being hand fitted by a gunsmith the rifle could be assembled by less trained craftsmen.
Safety is the goal and anytime you play with the trigger group you want to do a through function test (with the rifle unloaded of course). Not just a trigger test but slam the bolt shut a few times and even jolt the rifles butt on the floor a few times to see if it will dry fire. If the rifle fails the test you have to re-adjust. If you think it is beyond your abilities to do this and have a safe rifle then by all means take it to a competent gunsmith. If you follow these directions and heed the warnings you should not have a problem but don’t blame me if you have an Accidental Discharge (AD) because of a senior moment or your brain housing group has a headspace and timing issue.
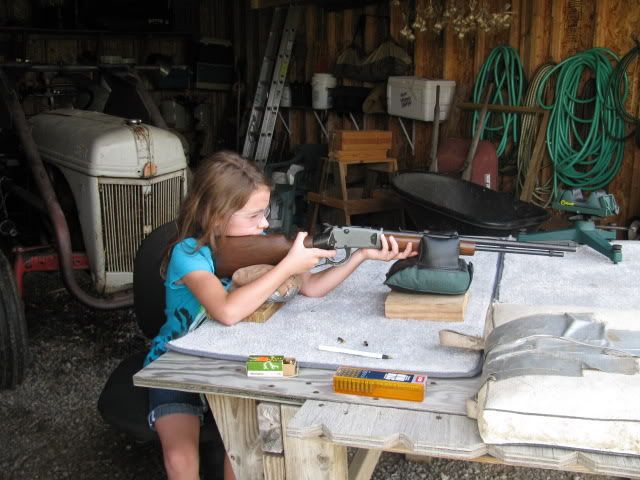
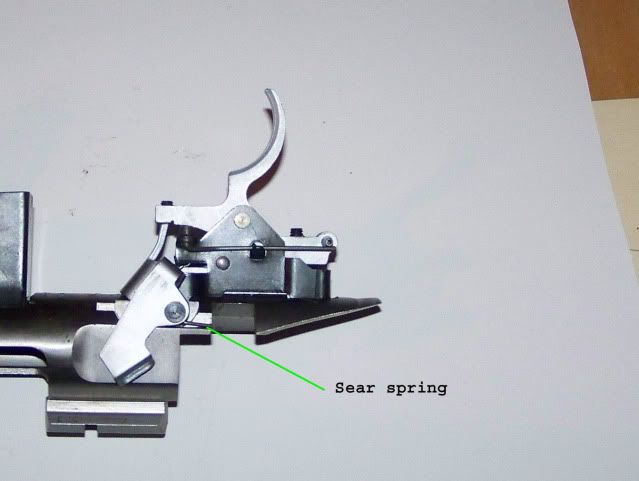
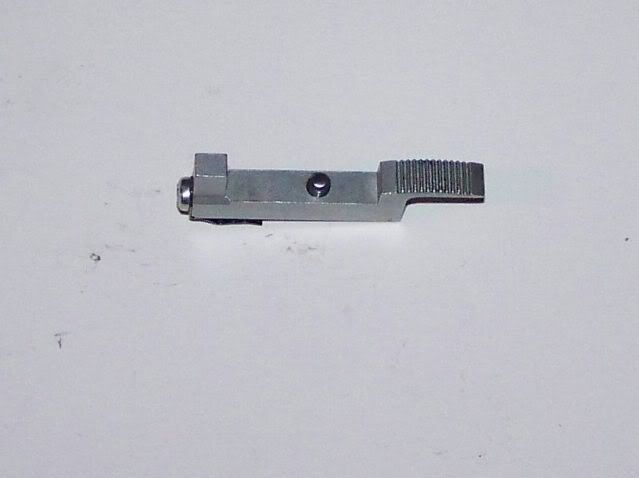
To start off we will look over the trigger group with the action removed from the stock. I will number all the set screws in the order of adjustment. It is important to note the position of the sear spring. Most of the photos show a model 112 which would be about the same as a 10ML-I, aside from the difference in the sear it is the same as a 10ML-II.
I’ll come back to adjustments but let’s say we are going to tear this puppy down. Tool wise at the minimum we will need,
A pair of needlenose pliers
A medium flat blade screw driver
A #2 phillips screw driver
A 5/64” allen wrench (a bit will not work)
Some blue Loctite
See if your wife has a very fine emery board (like 400-600), great tool for trigger work and much cheaper then those small gunsmith hones.
A knife edge jewelers file
As far as lubrication, for the range a moly paste/grease works great, for the field where you do not want something that collects dirt. My favorite is “Lock Ease” which is a very light oil with graphite. The oil may vaporize but the graphite stays behind. Brownells also sells a moly treatment called Action Magic II that some people talk highly about.
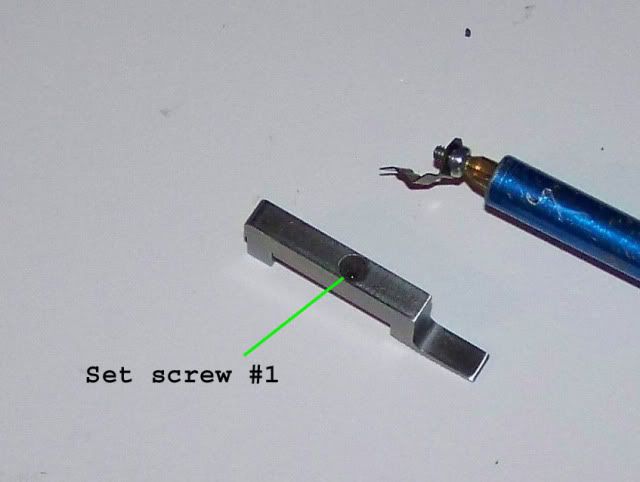
First we want to take the action from the stock and I like to remove the scope to make things easier and prevent damage to the scope. Look things over so you are familiar with where everything is at. Notice where the sear spring is, that is what I get asked the most. I’ll identify where everything is at in the next two photos. Now I’m going to give each set screw a number in the order they are adjusted, it is important and I’ll come back to them in detail in the adjustment phase.
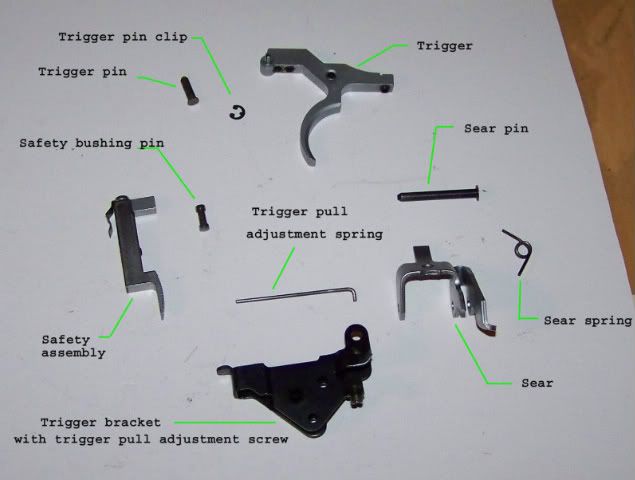
To start the tear down remove the bolt from the action and then small E-clip from the trigger pin, small parts here so you want to take precautions not to loose anything so you may want to put your parts in like a small bowl. Push out the trigger pin (you can use the 5/64 allen) and remove the trigger from the trigger bracket. Remove the trigger pull adjustment spring now so it doesn’t fall out where you least expect it. Now push out the sear pin and be careful that the sear spring doesn’t shoot out across the room. Set the sear, sear pin and sear spring to the side. Lift up on the sear pin end of the trigger bracket, the other end has a small tab that hooks into the receiver under the serrated safety tab. Once clear of the receiver push forward on the safety so that the safety detent spring is off the safety bearing pin. The safety bearing pin will now fall out. Now we are in pieces.
To start off we want to look at the receiver. Savage doesn’t polish the bottom and a critical area for a smooth safety is the area between slots, this is the area the safety adjustment set screw contacts the receiver.
After a good polishing the receiver is ready.
Now we want to look at the safety. The safety has 3 major points of contact, the set screw, the area underneath the detent spring and the area underneath the serrated part that you push/pull with your thumb. Basically what we want to do is remove all burrs. To start with you can screw in the set screw some so it sticks up and put a nice polished dome on the tip of the set screw.
I like to remove the detent spring and polish up all the surfaces and smooth any nicks on the edges. The post that sticks up is what engages the bolt handle when the safety is all the way to the rear. When you re-install the detent spring make sure it is square. Also add a small drop of Loctite on the detent spring screw. The safety is sintered metal so do not over tighten the screw, it is only a 5-40 screw 3/16” long so do not go overboard.
As far as the safety I have seen them break. The weak point is where the adjustment screw goes thru. I have also seen guys shear off the post trying to open the bolt when the safety is in the bolt locking position and when trying to tighten/loosen the bolt assembly screw with the bolt still in the action. There is a guy that is selling these over on gunbroker.com that are milled steel and Numrich also sells them. Last I looked the safety from the factory was $7.50 and the aftermarket was $23. Like some bolt parts Savage restricts sales of trigger parts to FFL holders. If by chance you need a part you can contact Fred or Lisa at Sharp Shooters Supply and they will fix you up.
Now we want to go over the trigger bracket. We want to polish the top of the tab that the safety rides on. This bracket had a sharp edge that was contacting the sear. Also a nice touch that you can do (but do not have to do) is on the trigger pull spring adjustment screw. On most 10MLs you may find on the spring side of the screw only two detents cut, so you can only adjust in 180° or half turns. You can take a knife edge jewelers file and carefully duplicate another set so you have detents every 90°.

Now it is the sears turn. I am not a big fan on changing angles of the sear engagement edges. What I do like to do is remove any burrs. With the Savage what happens when you pull the trigger the sear contacts the trigger and then when the trigger resets during cocking the sears rubs along trigger. The result may be a “curl” on the edge of the sear that you can easily feel. You want to remove this now and occasionally afterwards. A light pass with the emery board will take care of it.
Now we are ready to install the safety, trigger bracket and sear. We want to make sure we Loctite the safety adjustment screw but when we install it we have to have the adjustment screw tip flush with the top of the safety to start. If not we could break something. If you want to lubricate, a touch on the tab and the area between the slots on the receiver. Install the safety bearing pin in the bracket and then push the safety on it. The safety and safety detent spring keeps the pin in place. With the top of the receiver down hook the trigger bracket tab into the receiver. Now comes the hard part, take the sear and hold the sear spring in position and start the sear pin. Now your going to have to push down on the sear and the trigger bracket to get the sear pin lined up to go thru the trigger bracket and the receiver. I’ll use like a 3/32” allen on the opposite side of the sear to help line things up. Remember that the one end of the sear spring pretty much lines up with the bolt handle cut on the receiver. Hopefully it didn’t take you long and you have the sear pin in. What keeps the sear pin where it belongs is the stock once the action is in it. What we have to do now is adjust the safety, with the 5/64” allen turn the safety adjustment screw (set screw #1) in until there is no up and down play in the safety and the safety still slides front to rear (on – off) easily.
Now we are ready for the trigger. You want to polish up the tips of the set screws, you do not want much of a dome on set screw #2 (if your trigger has one), but a good square flat tip. When polishing set screw #2 be careful not to damage the sear engagement cut. Screw the set screws in to raise it above the surface so you can accomplish it. Once I get the set screw tips done I will back them out. With set screw #2 backed out you can clean the sear engagement area. Just use the emery board lightly a pass or two to clean the edges up if needed.
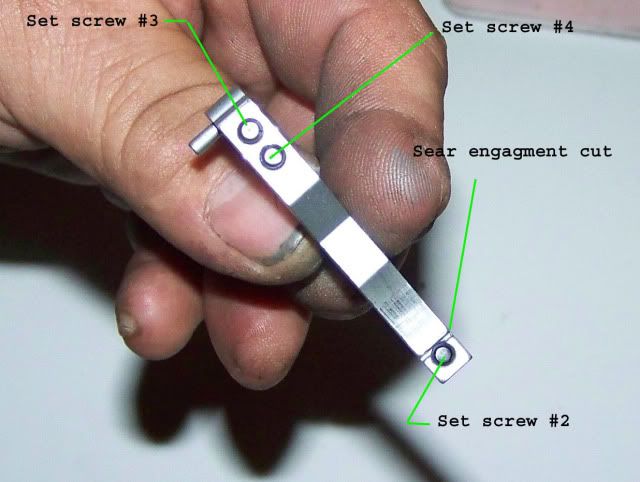
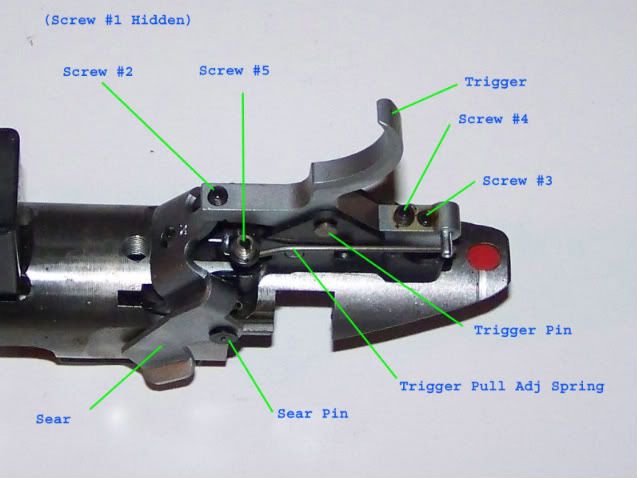
The trigger is sintered metal like the safety so you do not want to file on it too much. If you get thru the surface hardness the inside is pretty soft. I will back the set screws out and apply some Loctite and then set the set screws 2, 3 and 4 tips flush with the surfaces and now re-install the trigger pull spring, trigger, trigger pin and install the trigger pin E-clip. Re-install the bolt and we are ready to adjust. Here is a line drawing showing the adjustment screws. Set screw #2 is one that came and went and then comes back on the Savage. Most SS models seems to have them but I have seen blued actions with and without them.
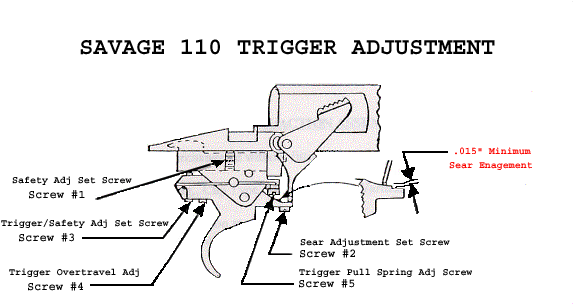
It is important that you do the adjustments in order. If for some reason you have to go back you have to start over from that point. We have already adjusted set screw #1 so next is set screw #2 which adjusts the amount of sear engagement or as most people call it creep. Savage recommends a minimum .015” sear engagement but for a field gun I personally like a lot. The easiest way to adjust this is with the bolt cocked and safety off simply screw the set screw in till the sear drops and then back the set screw out ½ turn (simple math, 8-32 set screw, 32 threads per inch, one turn equals 0.03125). I personally like ½ to ⅔; for the range and ¾ to a full turn for the field. My centerfires are ⅔; and my 10ML is about ¾. Now to set screw #3, the trigger/safety adjustment screw. With the bolt cocked and safety in the ON position tighten the set screw till it contacts the safety. The trigger travel should be next to zero when the safety is on but you should be able to move the safety on and off easily. Now we are ready for set screw #4, trigger over travel adjustment. I have never seen this set screw adjusted from the factory. Basically with the bolt cocked and safety off, turn this screw until it touches the safety. Try to pull the trigger and see if the sear drops, keep backing the screw out a ¼ turn at a time till it does and then a ¼ turn more. One thing you have to watch is if the over travel screw is real close the sear drags on the trigger. It may interfere with the firing pin dropping and give you a “soft” primer hit. If you have ignition problems try backing this screw off another ¼ turn and see if that cures the problem. Now to set screw #5, the trigger pull adjustment screw. This screw allows you to slightly adjust the trigger pull weight. You do not want too light of trigger pull spring tension with this trigger. Its purpose is to help with resetting the sear and too light you may not get full sear engagement when the trigger resets. You also want to make sure the spring goes into one of the detents or grooves on set screw #5.
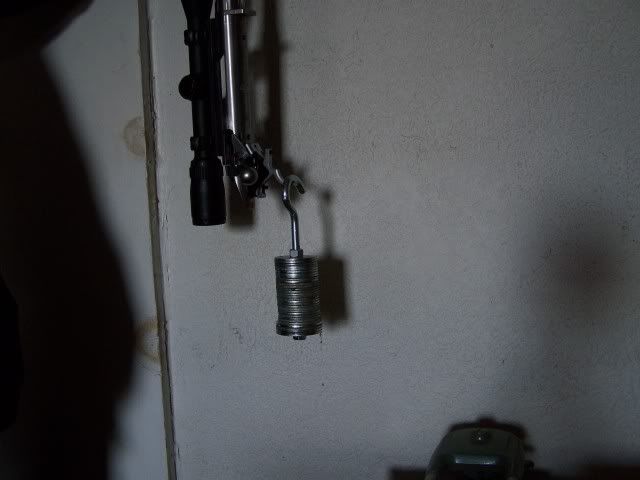
For those of us that do not have a fancy-dancy trigger pull gauge you can rig up a makeshift one pretty easy. I made this one from a rod and just add or subtract heavy washers as needed. This one is 2.5lbs as pictured. It may look crude but if you ever been to a NRA sanctioned shoot they used to use something very similar. Gauges can be off but a 3lb weight is always a 3lb weight, no calibration needed.
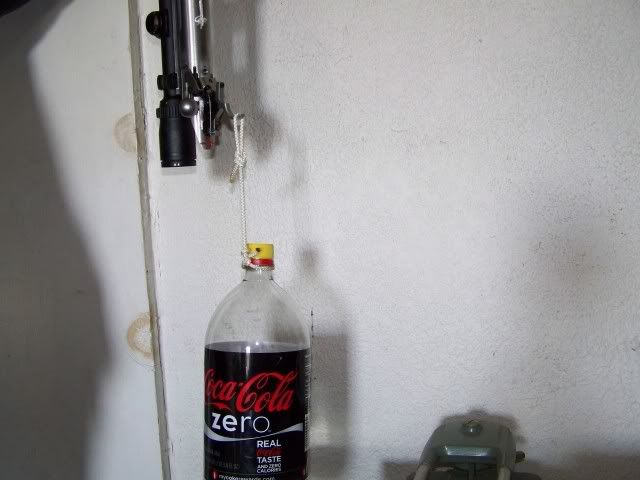
For those who believe in the quality and economics of red-neck engineering you can use a 2 liter pop bottle. One liter of water is 2.2 pounds so 1.364 liters is 3lb, if my math is right. You have to remember the weight of the bottle and string, which isn’t much, so if you have a kitchen scale you can check the weight.
The trigger pull adjustment spring does seem to go weak fairly fast so you may want to check our pull weight every couple of years. As always with springs, if their are any rust pits order you a new one.
Aftermarket triggers
Timney and Rifle Basix SAV-1
These triggers basically replace the factory trigger and do away with the factory trigger pull spring. They use a spring just forward of the overtravel adjustment set screw position to replace the factory trigger pull spring. They also switch the overtravel adjustment screw to the rear where it adjust against the trigger bracket instead of the safety. These triggers are milled steel instead of the sintered metal (MIM) in the factory trigger. The Timney is EDM cut and CNC machined with a advertised pull weight of 1.5 to 4 pounds. The Rifle Basix SAV-1 is investment cast tool steel with a advertised pull of 1 to 3 pounds. For a hunting rifle I recommend not to go below 2.0 and keep decent sear engagement (travel). There have been some complaints about both manufacturers on QC and spring quality. The Timney will not fit a Accutrigger model while the Rifle Basix
comes with longer set screws for the Accutrigger.
The Rifle Basix SAV-2
This trigger is a multi-lever design. Instead of the sear engaging the trigger it engages a separate lever and the trigger engages the sear lever. This takes the sear pressure off the trigger for easy pull and separate spring helps with reset to get good sear engagement. While it still uses the factory safety and sear it comes with a new trigger bracket to house the extra parts. More parts and a bit more complicated but comes with a DVD to explain everything. Has an advertised pull weight of 4oz to 3 pounds. Early units required a serious make over to get down to a quality 4oz pull and even then safe operation below 1 pound was questionable. The factory revamped the trigger a few years ago and newer units are better quality although most of the parts are MIM. Supposedly with this trigger when set light, if you work the safety 3 or 4 times the rifle will go off.
The Jard trigger
This a more of a bench trigger. Not only does it replace the trigger but also the sear. Advertised pull weight of 1 to 1.5 pounds.
The Sharp Shooter Supply Competition Trigger
This is a multi-lever design and is basically a module that replaces the factory trigger. The factory safety, sear and trigger bracket are still used. Although it has an advertised pull weight of 12oz to 2 pounds some people are using this in the field set heavy. 4130 heat treated steel for the major parts. About the only thing bad I have heard was that Fred got a batch of sub-standard springs that didn’t last long but Fred replaced them free of charge.
The Canjar Trigger
The only aftermarket trigger available for the Savage before the late 90s was a Canjar. Probly the finest made trigger it was also very expensive (a single set would put you back $400-500). Matt Canjar was THE MAN when it came to triggers. When he passed away a few years ago his employees tried to keep the shop going but with high prices and no web presence they had to close the doors last year. The finest hunting trigger I had the chance to pull was a Canjar single set trigger on a Ruger #1. In the un-set mode you had about a 3.5 pound pull, push the trigger into set mode and it was a crisp 6oz that supposedly could be set less. Guys are buying up used rifles with Canjar triggers when they appear for just the trigger.
The Jewel Trigger/ SSS Evolution Trigger
Jewel made a few Savage triggers but shelved the project. From what I understand it was based on a design by a Savage engineer and after Jewel decided to shelve it, in favor of concentrating on more easily made and profitable Remy triggers, passed the design to Fred at SSS. Fred refined it and is now selling it as the Evolution trigger. It is a benchrest only trigger with pull measured in ounces.
As always if you guys see something I missed or needs clarified let me know. Remember safety is main thing and periodic function tests should always be performed to insure the safety is working.
The main difference between the AccuTrigger and the older one is the trigger bar, or as Savage calls it the AccuRelease lever. The thumb safety on both models blocks the trigger. With the older model if the sear dis-engages or drops the gun will fire. With the AccuTrigger the AccuRelease lever catches the sear unless it is depressed. So if by chance the rifle is dropped or jarred heavily enough to dis-engage the sear the AccyRelease lever blocks the sear from dropping completely. How safe is it? Supposedly when the engineers showed the AccuTrigger Savage Arms owner and CEO Ron Coburn’s test was to be lifted 20 feet by a forklift and he threw the rifle to the floor, it passed the test.
Just a bit of Savage history, people ask why was the trigger so cheaply made. The goal of the Savage design team was to come up with a quality rifle at a good price. Even the model number, 110, reflected the goal of a rifle with a MSRP of $110 (1950’s dollars). A lot of the innovative ideas such as using the barrel nut to set headspace, the floating bolthead and use of simple parts were employed to reduce manufacturing cost. Instead of every part being hand fitted by a gunsmith the rifle could be assembled by less trained craftsmen.
Safety is the goal and anytime you play with the trigger group you want to do a through function test (with the rifle unloaded of course). Not just a trigger test but slam the bolt shut a few times and even jolt the rifles butt on the floor a few times to see if it will dry fire. If the rifle fails the test you have to re-adjust. If you think it is beyond your abilities to do this and have a safe rifle then by all means take it to a competent gunsmith. If you follow these directions and heed the warnings you should not have a problem but don’t blame me if you have an Accidental Discharge (AD) because of a senior moment or your brain housing group has a headspace and timing issue.
To start off we will look over the trigger group with the action removed from the stock. I will number all the set screws in the order of adjustment. It is important to note the position of the sear spring. Most of the photos show a model 112 which would be about the same as a 10ML-I, aside from the difference in the sear it is the same as a 10ML-II.
I’ll come back to adjustments but let’s say we are going to tear this puppy down. Tool wise at the minimum we will need,
A pair of needlenose pliers
A medium flat blade screw driver
A #2 phillips screw driver
A 5/64” allen wrench (a bit will not work)
Some blue Loctite
See if your wife has a very fine emery board (like 400-600), great tool for trigger work and much cheaper then those small gunsmith hones.
A knife edge jewelers file
As far as lubrication, for the range a moly paste/grease works great, for the field where you do not want something that collects dirt. My favorite is “Lock Ease” which is a very light oil with graphite. The oil may vaporize but the graphite stays behind. Brownells also sells a moly treatment called Action Magic II that some people talk highly about.
First we want to take the action from the stock and I like to remove the scope to make things easier and prevent damage to the scope. Look things over so you are familiar with where everything is at. Notice where the sear spring is, that is what I get asked the most. I’ll identify where everything is at in the next two photos. Now I’m going to give each set screw a number in the order they are adjusted, it is important and I’ll come back to them in detail in the adjustment phase.
To start the tear down remove the bolt from the action and then small E-clip from the trigger pin, small parts here so you want to take precautions not to loose anything so you may want to put your parts in like a small bowl. Push out the trigger pin (you can use the 5/64 allen) and remove the trigger from the trigger bracket. Remove the trigger pull adjustment spring now so it doesn’t fall out where you least expect it. Now push out the sear pin and be careful that the sear spring doesn’t shoot out across the room. Set the sear, sear pin and sear spring to the side. Lift up on the sear pin end of the trigger bracket, the other end has a small tab that hooks into the receiver under the serrated safety tab. Once clear of the receiver push forward on the safety so that the safety detent spring is off the safety bearing pin. The safety bearing pin will now fall out. Now we are in pieces.
To start off we want to look at the receiver. Savage doesn’t polish the bottom and a critical area for a smooth safety is the area between slots, this is the area the safety adjustment set screw contacts the receiver.
After a good polishing the receiver is ready.
Now we want to look at the safety. The safety has 3 major points of contact, the set screw, the area underneath the detent spring and the area underneath the serrated part that you push/pull with your thumb. Basically what we want to do is remove all burrs. To start with you can screw in the set screw some so it sticks up and put a nice polished dome on the tip of the set screw.
I like to remove the detent spring and polish up all the surfaces and smooth any nicks on the edges. The post that sticks up is what engages the bolt handle when the safety is all the way to the rear. When you re-install the detent spring make sure it is square. Also add a small drop of Loctite on the detent spring screw. The safety is sintered metal so do not over tighten the screw, it is only a 5-40 screw 3/16” long so do not go overboard.
As far as the safety I have seen them break. The weak point is where the adjustment screw goes thru. I have also seen guys shear off the post trying to open the bolt when the safety is in the bolt locking position and when trying to tighten/loosen the bolt assembly screw with the bolt still in the action. There is a guy that is selling these over on gunbroker.com that are milled steel and Numrich also sells them. Last I looked the safety from the factory was $7.50 and the aftermarket was $23. Like some bolt parts Savage restricts sales of trigger parts to FFL holders. If by chance you need a part you can contact Fred or Lisa at Sharp Shooters Supply and they will fix you up.
Now we want to go over the trigger bracket. We want to polish the top of the tab that the safety rides on. This bracket had a sharp edge that was contacting the sear. Also a nice touch that you can do (but do not have to do) is on the trigger pull spring adjustment screw. On most 10MLs you may find on the spring side of the screw only two detents cut, so you can only adjust in 180° or half turns. You can take a knife edge jewelers file and carefully duplicate another set so you have detents every 90°.
Now it is the sears turn. I am not a big fan on changing angles of the sear engagement edges. What I do like to do is remove any burrs. With the Savage what happens when you pull the trigger the sear contacts the trigger and then when the trigger resets during cocking the sears rubs along trigger. The result may be a “curl” on the edge of the sear that you can easily feel. You want to remove this now and occasionally afterwards. A light pass with the emery board will take care of it.
Now we are ready to install the safety, trigger bracket and sear. We want to make sure we Loctite the safety adjustment screw but when we install it we have to have the adjustment screw tip flush with the top of the safety to start. If not we could break something. If you want to lubricate, a touch on the tab and the area between the slots on the receiver. Install the safety bearing pin in the bracket and then push the safety on it. The safety and safety detent spring keeps the pin in place. With the top of the receiver down hook the trigger bracket tab into the receiver. Now comes the hard part, take the sear and hold the sear spring in position and start the sear pin. Now your going to have to push down on the sear and the trigger bracket to get the sear pin lined up to go thru the trigger bracket and the receiver. I’ll use like a 3/32” allen on the opposite side of the sear to help line things up. Remember that the one end of the sear spring pretty much lines up with the bolt handle cut on the receiver. Hopefully it didn’t take you long and you have the sear pin in. What keeps the sear pin where it belongs is the stock once the action is in it. What we have to do now is adjust the safety, with the 5/64” allen turn the safety adjustment screw (set screw #1) in until there is no up and down play in the safety and the safety still slides front to rear (on – off) easily.
Now we are ready for the trigger. You want to polish up the tips of the set screws, you do not want much of a dome on set screw #2 (if your trigger has one), but a good square flat tip. When polishing set screw #2 be careful not to damage the sear engagement cut. Screw the set screws in to raise it above the surface so you can accomplish it. Once I get the set screw tips done I will back them out. With set screw #2 backed out you can clean the sear engagement area. Just use the emery board lightly a pass or two to clean the edges up if needed.
The trigger is sintered metal like the safety so you do not want to file on it too much. If you get thru the surface hardness the inside is pretty soft. I will back the set screws out and apply some Loctite and then set the set screws 2, 3 and 4 tips flush with the surfaces and now re-install the trigger pull spring, trigger, trigger pin and install the trigger pin E-clip. Re-install the bolt and we are ready to adjust. Here is a line drawing showing the adjustment screws. Set screw #2 is one that came and went and then comes back on the Savage. Most SS models seems to have them but I have seen blued actions with and without them.
It is important that you do the adjustments in order. If for some reason you have to go back you have to start over from that point. We have already adjusted set screw #1 so next is set screw #2 which adjusts the amount of sear engagement or as most people call it creep. Savage recommends a minimum .015” sear engagement but for a field gun I personally like a lot. The easiest way to adjust this is with the bolt cocked and safety off simply screw the set screw in till the sear drops and then back the set screw out ½ turn (simple math, 8-32 set screw, 32 threads per inch, one turn equals 0.03125). I personally like ½ to ⅔; for the range and ¾ to a full turn for the field. My centerfires are ⅔; and my 10ML is about ¾. Now to set screw #3, the trigger/safety adjustment screw. With the bolt cocked and safety in the ON position tighten the set screw till it contacts the safety. The trigger travel should be next to zero when the safety is on but you should be able to move the safety on and off easily. Now we are ready for set screw #4, trigger over travel adjustment. I have never seen this set screw adjusted from the factory. Basically with the bolt cocked and safety off, turn this screw until it touches the safety. Try to pull the trigger and see if the sear drops, keep backing the screw out a ¼ turn at a time till it does and then a ¼ turn more. One thing you have to watch is if the over travel screw is real close the sear drags on the trigger. It may interfere with the firing pin dropping and give you a “soft” primer hit. If you have ignition problems try backing this screw off another ¼ turn and see if that cures the problem. Now to set screw #5, the trigger pull adjustment screw. This screw allows you to slightly adjust the trigger pull weight. You do not want too light of trigger pull spring tension with this trigger. Its purpose is to help with resetting the sear and too light you may not get full sear engagement when the trigger resets. You also want to make sure the spring goes into one of the detents or grooves on set screw #5.
For those of us that do not have a fancy-dancy trigger pull gauge you can rig up a makeshift one pretty easy. I made this one from a rod and just add or subtract heavy washers as needed. This one is 2.5lbs as pictured. It may look crude but if you ever been to a NRA sanctioned shoot they used to use something very similar. Gauges can be off but a 3lb weight is always a 3lb weight, no calibration needed.
For those who believe in the quality and economics of red-neck engineering you can use a 2 liter pop bottle. One liter of water is 2.2 pounds so 1.364 liters is 3lb, if my math is right. You have to remember the weight of the bottle and string, which isn’t much, so if you have a kitchen scale you can check the weight.
The trigger pull adjustment spring does seem to go weak fairly fast so you may want to check our pull weight every couple of years. As always with springs, if their are any rust pits order you a new one.
Aftermarket triggers
Timney and Rifle Basix SAV-1
These triggers basically replace the factory trigger and do away with the factory trigger pull spring. They use a spring just forward of the overtravel adjustment set screw position to replace the factory trigger pull spring. They also switch the overtravel adjustment screw to the rear where it adjust against the trigger bracket instead of the safety. These triggers are milled steel instead of the sintered metal (MIM) in the factory trigger. The Timney is EDM cut and CNC machined with a advertised pull weight of 1.5 to 4 pounds. The Rifle Basix SAV-1 is investment cast tool steel with a advertised pull of 1 to 3 pounds. For a hunting rifle I recommend not to go below 2.0 and keep decent sear engagement (travel). There have been some complaints about both manufacturers on QC and spring quality. The Timney will not fit a Accutrigger model while the Rifle Basix
comes with longer set screws for the Accutrigger.
The Rifle Basix SAV-2
This trigger is a multi-lever design. Instead of the sear engaging the trigger it engages a separate lever and the trigger engages the sear lever. This takes the sear pressure off the trigger for easy pull and separate spring helps with reset to get good sear engagement. While it still uses the factory safety and sear it comes with a new trigger bracket to house the extra parts. More parts and a bit more complicated but comes with a DVD to explain everything. Has an advertised pull weight of 4oz to 3 pounds. Early units required a serious make over to get down to a quality 4oz pull and even then safe operation below 1 pound was questionable. The factory revamped the trigger a few years ago and newer units are better quality although most of the parts are MIM. Supposedly with this trigger when set light, if you work the safety 3 or 4 times the rifle will go off.
The Jard trigger
This a more of a bench trigger. Not only does it replace the trigger but also the sear. Advertised pull weight of 1 to 1.5 pounds.
The Sharp Shooter Supply Competition Trigger
This is a multi-lever design and is basically a module that replaces the factory trigger. The factory safety, sear and trigger bracket are still used. Although it has an advertised pull weight of 12oz to 2 pounds some people are using this in the field set heavy. 4130 heat treated steel for the major parts. About the only thing bad I have heard was that Fred got a batch of sub-standard springs that didn’t last long but Fred replaced them free of charge.
The Canjar Trigger
The only aftermarket trigger available for the Savage before the late 90s was a Canjar. Probly the finest made trigger it was also very expensive (a single set would put you back $400-500). Matt Canjar was THE MAN when it came to triggers. When he passed away a few years ago his employees tried to keep the shop going but with high prices and no web presence they had to close the doors last year. The finest hunting trigger I had the chance to pull was a Canjar single set trigger on a Ruger #1. In the un-set mode you had about a 3.5 pound pull, push the trigger into set mode and it was a crisp 6oz that supposedly could be set less. Guys are buying up used rifles with Canjar triggers when they appear for just the trigger.
The Jewel Trigger/ SSS Evolution Trigger
Jewel made a few Savage triggers but shelved the project. From what I understand it was based on a design by a Savage engineer and after Jewel decided to shelve it, in favor of concentrating on more easily made and profitable Remy triggers, passed the design to Fred at SSS. Fred refined it and is now selling it as the Evolution trigger. It is a benchrest only trigger with pull measured in ounces.
As always if you guys see something I missed or needs clarified let me know. Remember safety is main thing and periodic function tests should always be performed to insure the safety is working.